
Operator's Manual


IMPORTANT: Read this Operator’s Manual
thoroughly before operating the cutting unit. Failure
to do so may result in damage to the cutting unit or
an unsatisfactory quality of cut.
IMPORTANT: Toro strongly recommends the use of a
leveling plate when setting up or adjusting any reel-
type cutting unit. The leveling plate will help to
ensure accurate and consistent adjustments.
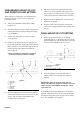
Note: Right and left ends of the cutting unit are
determined by standing in the operator’s position
(Fig. 1).
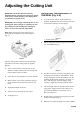
Figure 1
After the cutting unit is unboxed, use the following
procedures to assure the cutting units are adjusted
properly.
1. Check each end of the reel for grease. Grease
should be visibly evident in the reel bearings and
internal splines of the reel shaft.
2. Insure that all nuts and bolts are securely fastened.
3. Make sure the carrier frame suspension operates
freely and does not bind when moved back and
forth.
4. Adjust the bedknife to the reel.
5. Adjust and level the front and rear rollers.
6. Set height of cut.
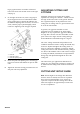
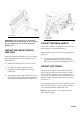
ADJUSTING THE BEDKNIFE TO
THE REEL (Fig. 2–4)
1. A 19-mm wrench will be needed to rotate the
bedknife adjustment knob. Each notch on the knob
will move the bedknife .013 mm (Fig.2).
Figure 2
1. Bedknife adjusting knob
2. Tip the cutting unit rearward to gain access to the
reel and bedknife (Fig. 3)
Figure 3
3. On either end of the reel, insert a long strip of dry
newspaper between the reel and bedknife. While
slowly rotating the reel into the bedknife, turn the
bedknife-adjusting knob clockwise, one click at a
time, until the paper is pinched lightly, which
results in a slight drag when the paper is pulled.
4. Check for light contact at the other end of the reel
using paper. If light contact is not evident or if a
gap exists, the bedknife is not parallel to reel.
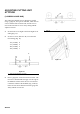
Proceed to steps 5–9.
5. Slightly loosen (2) locknuts securing the pivot hub
to the left side plate (Fig. 4).
6. Rotate the pivot hub adjusting screw until a slightly
3
Adjusting the Cutting Unit