
Operator's Manual


larger gap between the reel blades and the bed
knife exists on the left end than exists on the right
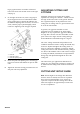
end (Fig. 4).
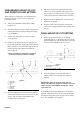
7. On the right end of the reel, insert a long strip of
dry newspaper between reel and bedknife. While
slowly rotating the reel toward the bedknife, turn
the bedknife adjusting knob clockwise, one click at
a time, until the paper is pinched lightly, which
results in a slight drag when the paper is pulled
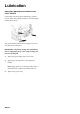
Figure 4
1. Pivot hub
2. Pivot hub locknuts
3. Pivot hub adjusting screw
8. Rotate the pivot hub adjusting screw until the gap
between reel blades and bedknife is equal on both
ends.
9. Tighten the locknuts securing pivot hub to the left
side plate and verify adjustment.
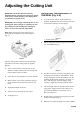
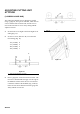
ADJUSTING CUTTING UNIT
ATTITUDE
Adjustable front and rear brackets allow infinite
adjustment of cuffing unit “attitude”. Attitude refers to
the angle of the knife relative to the ground. Attitude
has a significant impact on the performance of the
cutting unit. All cutting units on a given machine must
be set to the same attitude.
In general, less aggressive attitudes are more
appropriate for lower heights of cut while, higher
heights of cut may require more aggressive attitudes.
An angle that is too flat will allow the bedbar or other
parts of the reel to drag in the turf causing tufting or
marks. Minimum recommended angle is 2 degrees.
The “best” cutting unit attitude is dependent on turf
conditions and desired results. Cutting unit attitude may
need to be adjusted throughout the cutting season to
allow for various turf conditions. Experience with the
cutting unit on the turf will determine the best_setting to
use. Wear of the bedknife and reel will result in changes
to cutting unit attitude, which must be compensated for
during setup and adjusted throughout the life of the
cutting unit.
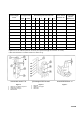
The charts below give approximate dimensions for
setting up a new cutting unit to 6 degrees. Changes can
be made from this setting based on observed results in
the turf.
CUTTING UNIT SET-UP GUIDE
Note: If final height-of-cut settings other than those
shown in chart are desired, select the set of position
holes closest to desired height of cut. Use the top
capscrews to adjust to the final setting. Note: Set the
initial rear height of cut approximately 9.5 mm lower
for ease of adjustment.
4