
Operator's Manual


13
Maintenance
Note: Determine the left and right sides of the machine
from the normal operating position.
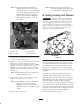
Cutting Unit Daily Adjustments
Prior to each day’s mowing, or as required, each
cutting unit must be checked to verify proper
bedknife–to–reel contact. This must be performed
even though quality of cut is acceptable.
1. Lower cutting units onto a hard surface, shut off
engine and remove key from ignition.
2. Slowly rotate reel in reverse direction listening
for reel–to–bedknife contact. If no contact is evident,
turn bedknife adjusting knob clockwise, one click at a
time, until light contact is felt and heard.
3. If excessive contact is felt, turn bedknife
adjusting knob counterclockwise, one click at a time
until no contact is evident. Then turn bedknife
adjusting knob one click at a time clockwise, until
light contact is felt and heard.
Important Light contact is preferred at all times. If
light contact is not maintained, bedknife / reel edges will
not sufficiently self–sharpen and dull cutting edges will
result after a period of operation. If excessive contact is
maintained, bedknife/reel wear will be accelerated,
uneven wear can result, and quality of cut may be
adversely affected.
Note: As the reel blades continue to run against
the bedknife a slight burr will appear
on the front cutting edge surface the
full length of the bedknife. If a file (or
a light face grind) is occasionally run
across the front edge to remove this
burr, improved cutting edge sharpness
can be obtained.
After extended running, a ridge will eventually
develop at both ends of the bedknife. These notches
must be rounded off or filed flush with cutting edge
of bedknife to assure smooth operation.
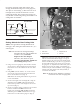
Lubrication
Each cutting unit has (7) grease fittings (Fig. 15) that
must be lubricated regularly with No. 2 General
Purpose Lithium Base Grease.
The lubrication points are front roller (2), rear roller
(2), reel bearing (2) and bedknife adjuster.
Important Lubricating cutting units immediately after
washing helps purge water out of bearings and increases
bearing life.
1. Wipe each grease fitting with a clean rag.
2. Apply grease until clean grease is seen coming out of
roller seals and bearing relief valve.
3. Wipe excess grease away.
(2)
(2)
1
(2)
Figure 15
1. Relief valve
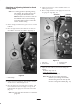
Reel Bearing Adjustment
To insure long life of the reel bearings, periodically
check if reel end play exits. The reel bearings can be
checked and adjusted as follows:
Note: Bearing and bearing housing were preset
at factory as indicated with a paint
mark.
1. Loosen reel to bedknife contact by turning the
bedknife adjusting knob (Fig. 16) counter–clockwise
until no contact exists.