
Installation Instructions


FormNo.3370-692RevB
GroomerReelKit
Greensmaster
®
800,1000and1600
ModelNo.04131
ModelNo.04132
ModelNo.04133
InstallationInstructions
LooseParts
Description
Qty.
HeightOfCutArm
2
FrameAssemblyR.H.1
FrameAssemblyL.H.1
BearingAdapter2
Spacers
4
SlotCover
2
FlatHeadScrews
2
Locknut4
GroomingReelAssembly
1
DrivenPulley1
Locknut1
DrivePulley1
Belt1
RingAdapter2
Operator’sManual
1
PartsCatalog
1
SetUpInstructions
Important:Readtheseinstructionsthoroughly
beforesettinguporoperatingthegroomer.Failure
tofollowthesetuporoperatinginstructionsin
thismanualmayresultindamagetothemachine,
groomerandtheturf.
Note:Theterms“left”and“right”usedinthetext
refertotheleftandrightsidesofthemachineasviewed
fromtheoperatorsposition.
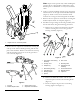
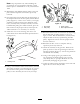
1.Loosenthejamnutsandsetscrewssecuringeach
endofthefrontrollertotheheight–of–cutarms
(
Figure1).
2.Removethecarriageboltsandlocknutssecuring
theheightofcutarmstotheadjustingbrackets
(
Figure1).Removetheheightof–cutarmsandroller
assembly.
3.OntheGreensmaster1600only,removethe
height–of–cutadjustingscrews,jamnutsandset
screwsfromtheheight–of–cutarms(Figure1).
OntheGreensmaster800and1000only,remove
thetwotaperfaceboltssecuringtherightandleft
height–of–cutbracketstothesideplates(
Figure1).
Installtheheight–of–cutbracketstotheopposite
sidesofthemachinewiththeboltsremoved.Use
therearsetsofmountingholesinthesideplates.
g017178
1
2
3
4
5
6
Figure1
1.Heightofcutarm4.Heightofcutadjusting
screw
2.Jamnutandsetscrew
5.Heightofcutbracket
3.Carriagebolt,washer&
locknut
6.Taperfacebolt
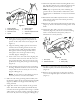
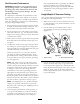
4.OnGreensmaster1600only,installthenew
height–of–cutarmsandrollerassemblywiththe
height–of–cutadjustingscrews,jamnutsandset
screwspreviouslyremoved(
Figure2).
OnGreensmaster800and1000,installthe
height–of–cutarmspreviouslyremoved.The
height–of–cutarmsonbothmodelsaretoberotated
totheforwardpositionasshowninFigure2.
©2012—TheToro®Company
8111LyndaleAvenueSouth
Bloomington,MN55420
Registeratwww.Toro.com.
OriginalInstructions(EN)
PrintedintheUSA.
AllRightsReserved