
Operator's Manual

8
Height/Depth of Groomer Setting
The groomer blade height/depth of grooming can be set
using the following procedure:
1. Make sure the rollers are clean and main reel is set to
desired height of cut. Position machine on a flat, level
work surface.
2. Lower the grooming reel into the grooming position.
Refer to Raising and Lowering groomer, page 7.
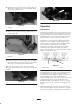
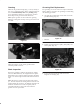
3. On one end of groomer shaft, measure the distance
from the lowest tip of a groomer blade to work
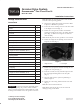
surface. Turn the groomer height adjusting knob
(Fig. 30) to raise or lower blade tip to the desired
grooming height. Each notch on the adjusting knob is
approximately equal to .003 inch of groomer depth.
1
Figure 30
1. Groomer height adjusting knob
4. Repeat procedure on opposite end of groomer, then
recheck setting on first side. Readjust as required.
5. If grooming mode is not going to be used, raise the
grooming reel into the transport position. Refer to
Raising and Lowering groomer, page 7.
Note: At higher grooming heights, the grooming reel may
have to be set in the raised (transport) position, thus
making the raise/lower feature unavailable.
Testing Groomer Performance
Important Improper or over-aggressive use of the
grooming reel (i.e., too deep or too frequent grooming)
may cause unnecessary stress on the turf leading to severe
greens damage. Use the groomer cautiously.
It is important to determine the performance of the
groomer before putting it into regular use on greens. We
strongly suggests that a formal test procedure be used. The
following is a practical way of determining the proper
height/depth setting:
1. Set the cutting reel to the height of cut that would
normally be used without the grooming reel. Use a
Wiehle roller and scraper for the front roller.
2. Set the groomer reel 1/2 the height of cut setting above
the roller level. (e.g. for 1/8” (.125) height of cut
setting , set the groomer at 1/16” (.063) above roller).
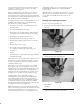
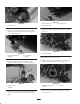
3. Make a pass over the test green, then lower the
groomer flush with the roller level and make another
pass over the test green.
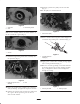
4. Compare the results. The first groomed area when the
setting was 1/2 the height of cut setting above the
roller level will have removed significantly less grass
and thatch than the second setting.
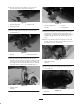
Check the test green 2 or 3 days after the first grooming
for general condition/damage. If the groomed areas are
turning yellow/brown, and the non-groomed areas are
green, then the grooming was too aggressive.
Note: The color of the grass will change when the
grooming reel is used. This can be observed with the first
grooming and will continue over time. Experience will
allow the greens superintendent to judge by color of the
turf (along with close examination) if the current
grooming practice is appropriate for the particular green.
Because the grooming reel stands up more grass and
removes thatch, the quality of the cut will not be the same
as without the groomer. This effect is most noticeable the
first few times a groomer is used on a green.
Note: On multiple passes (i.e., double and triple cutting),
the groomer will continue to penetrate deeper on each
successive pass. Multiple passes are not recommended.
5. After testing the performance of the groomer on a test
green and satisfactory results are obtained, grooming
on the playing greens can begin. It is important to
realize, however, that each green may respond
differently to grooming. In addition, growing
conditions are constantly changing. Inspect the
groomed greens frequently and make adjustments to
the grooming procedure as often as necessary.
Transport Mode
Important When transporting the machine, be sure to
disengage the cutting unit and raise the grooming reel into
its transport (raised) position.
Maintenance
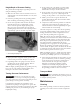
Cleaning
Hose off the grooming reel after use. Do not permit the
grooming reel to stand in water so that the components
rust.