
Installation Instructions

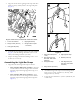
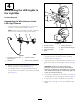
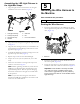
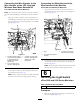


Figure13
1.Plug3.2-positionrockerswitch
2.Opening(controlpanel)
4.10-socketconnector
(wireharness—LEDlight
andwirelesshourmeter
harnesskit)
2.Pullupthe8-socketconnectorofthewireharnessfor
themachinethroughtheopeninginthecontrolpanel
(Figure13).
3.Connectthe8-pinconnectorofthe2-positionrocker
switchintothe8-socketconnectorofthewireharness
forthemachine(Figure13).
Note:Ensurethattheconnectorsarefullyseatedand
thelatchoftheconnectorssnaptogethersecurely.
4.Aligntheswitchsothatthenotchinthebodyofthe
switchistowardthebackofthecontrolpanel(Figure
14).
Figure14
1.Opening(controlpanel)3.Notch(body—rocker
switch)
2.Rockerswitch
4.Backofthecontrolpanel
5.Inserttheswitchintotheopeninginthecontrolpanel
untiltheswitchsnapssecurelyintothepanel(Figure
14).
8