Form No. 3326-619 Rev A 8-Blade and 11-Blade 4-Bolt Reel Mower Greensmaster 3000 Series Model No. 04404—Serial No. 220000001 and Up Model No. 04406—Serial No. 220000001 and Up Model No. 04408—Serial No.
Write the product model and serial numbers in the space below: Contents Introduction . . . . . . . . . . . . . . . . . . . . . . . . . . . . . . . . Optional Equipment . . . . . . . . . . . . . . . . . . . . . . . . . . Setup . . . . . . . . . . . . . . . . . . . . . . . . . . . . . . . . . . . . . Loose Parts . . . . . . . . . . . . . . . . . . . . . . . . . . . . . . Adjusting the Bedknife to the Reel . . . . . . . . . . . . Adjusting the Shield Height . . . . . . . . . . . . . . . . .
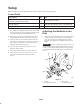
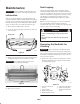
Setup Note: Determine the left and right sides of the machine from the normal operating position. Loose Parts Description Qty. Use Ball stud 2 Internal tooth lock washer, 3/8 in. 2 Flange locknut 2 Mounting the reel drive motor to the cutting unit Registration card 1 Fill out and return to Toro. Mounting the front roller 1. The cutting unit is shipped without a front roller. Install the roller using the loose parts supplied with the cutting unit and the instructions included with the roller.
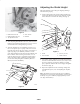
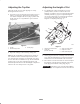
Adjusting the Shield Height Adjust the shield to ensure that grass clipping discharge into the basket properly. 1. Set the cutting unit in the normal cutting position and measure the distance from the top of the front crossbar to the shield at each end of the cutting unit (Fig. 5). 4 Figure 3 1. Bedknife closer to reel 2. Bedknife further from reel 3. Top adjustment screw 4. 3/8 in. wrench 5. Bedknife 3 1 2.
Adjusting the Top Bar Adjusting the Height of Cut Adjust the top bar to ensure that clippings are cleanly discharged from the reel area. 1. For adjusting the cutting unit height of cut 1/4 in. (6 mm) or below, set the rear roller in the lowest height-of-cut position; refer to Leveling the Rear Roller Assembly to the Reel, page 9. To adjust the height of cut, turn the cutting unit over and loosen the locknuts on each end of the cutting unit securing the height-of-cut adjusting knob (Fig. 7). 1.
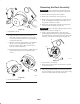
Reel Lapping Maintenance Connect a lapping machine to the cutting unit with an extension coupler and a 9/16 in. socket. The 9/16 in. Important To prevent damage to the hydraulic hoses, remove the reel motors before removing the cutting units. socket can be positioned onto the capscrew on the reel shaft inside the counterbalance weight on the end of the cutting unit. Backlap according to the procedures in the Toro Sharpening Reel and Rotary Mowers Manual, Form No.
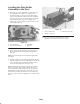
2. Loosen the Allen set screws anchoring the roller shaft (Fig. 10). 3. Remove the roller assembly from the cutting unit by pulling evenly on both sides. 3. Remove the rear roller height-of-cut brackets from both side plates. 4. For proper grinding of the reel, grind in accordance with the procedures in the Toro Sharpening Reel and Rotary Mowers Manual, Form No. 80-300PT. 4. Remove the bedbar mounting bolts from each end of the cutting unit (Fig. 10).
Removing the Reel Assembly Important To prevent damage to the hydraulic hoses, remove the reel motors before removing the cutting units. 1. Remove the front and rear roller assembly. 2. Remove the counterbalance end cap (Fig. 13). 3. Remove the large bearing adjustment nut from one end of the reel shaft (Fig. 14) and the special spline nut at the opposite end of the reel shaft. 4. Remove the mounting bolts from the bearing housing on both ends of the cutting unit (Fig. 15).
Leveling the Rear Roller Assembly to the Reel 1. Mount the rear roller and height-of-cut brackets onto the cutting unit. For height-of-cut settings 1/4 in. (6 mm) or below, set one bracket in the side plate to 1/8 in. (3 mm) from the bottom of the slot and tighten the nut on the capscrew. Leave the bracket on the other side mounted loosely (Fig. 16). For height-of-cut settings above 1/4 in. (6 mm), center the bracket in the slot and tighten the nut. Figure 17 1. Unit on a level surface 2.
The Toro General Commercial Products Warranty A Two-Year Limited Warranty Conditions and Products Covered The Toro Company and its affiliate, Toro Warranty Company, pursuant to an agreement between them, jointly warrant your 1996 or newer Toro Commercial Product (“Product”) purchased after January 1, 1997, to be free from defects in materials or workmanship for two years or 1500 operational hours*, whichever occurs first.