
Operator's Manual


5
Adjusting the Top Bar
Adjust the top bar to ensure that clippings are cleanly
discharged from the reel area.
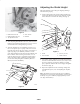
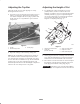
1. Loosen the screws securing the top bar (Fig. 6). Insert a
0.06 in. (1.5 mm) feeler gauge between the top of the
reel and bar and tighten the screws (Fig. 6). Ensure that
the bar and reel are an equal distance apart across the
complete reel.
Figure 6
1. Top bar
2. Bar mounting screws
3. Feeler gauge
2. Repeat the settings on the remaining cutting units.
Note: The bar is adjustable to compensate for changes in
turf conditions. The bar should be adjusted closer to the
reel when the turf is extremely wet and further away from
the reel when the turf conditions are dry. The bar should be
parallel to the reel to ensure optimum performance and
should be adjusted whenever the shield height is adjusted or
whenever the reel is sharpened on a reel grinder.
Adjusting the Height of Cut
1. For adjusting the cutting unit height of cut 1/4 in.
(6 mm) or below, set the rear roller in the lowest
height-of-cut position; refer to Leveling the Rear Roller
Assembly to the Reel, page 9. To adjust the height of
cut, turn the cutting unit over and loosen the locknuts
on each end of the cutting unit securing the
height-of-cut adjusting knob (Fig. 7).
m–5090
1
2
3
4
5
Figure 7
1. Height-of-cut knob locknut
2. Gauge bar
(Part No. 13-8199)
3. Gauge bar screw head
4. Height-of-cut knob
5. Roller shaft clamp bolt
2. On the gauge bar (Part No. 13-8199), set the head of the
screw to the desired height of cut. This measurement is
from the bar face to the underside of the screw head.
3. Place the bar across the front and rear rollers and adjust
the height-of-cut knob until the underside of the screw
head engages the bedknife cutting edge (Fig. 6).
Important Perform step 3 on each end of the bedknife.
Tighten the height-of-cut adjustment locknuts on both ends.