
Operator's Manual


9
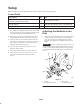
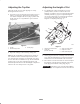
Leveling the Rear Roller
Assembly to the Reel
1. Mount the rear roller and height-of-cut brackets onto
the cutting unit. For height-of-cut settings 1/4 in.
(6 mm) or below, set one bracket in the side plate to
1/8 in. (3 mm) from the bottom of the slot and tighten
the nut on the capscrew. Leave the bracket on the other
side mounted loosely (Fig. 16). For height-of-cut
settings above 1/4 in. (6 mm), center the bracket in the
slot and tighten the nut.
Figure 16
1. Rear roller bracket
2. 1/4 in. (6 mm) steel plate
3. Reel blades
4. Bedknife
2. Place a 1/4 in. (6 mm) or thicker plate under the reel
blades and against the cutting edge of the bedknife
(Fig. 16).
Note: Be sure that the plate covers the full length of the
reel blades.
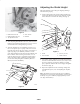
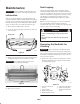
3. With the cutting unit reel blades positioned on the plate,
hold the cutting unit securely and push down on the rear
roller assembly until it contacts the working surface
across the full length of the roller (Fig. 17).
Note: This adjustment should be made on a flat working
surface. If the roller does not fully contact the surface
because the bracket is bottomed out in the slot, therefore
hindering the leveling of the roller, loosen the nut on the
roller bracket and move the bracket up in the slot to level
the roller on the flat surface. Tighten the nut and proceed to
step 4.
Figure 17
1. Unit on a level surface
2. Hold the unit securely
3. Push down on the roller
4. Secure the nut on the outside of the rear roller
height-of-cut bracket to lock the roller in place.