Form No. 3325-850 ® 8- and 11-Blade Cutting Units Greensmaster® 3250-D Model No. 04472—210000001 and Up Model No.
Write the product model and serial numbers in the space below: Contents Contents Introduction Optional Equipment Adjusting the Cutting Units Adjusting the Bedknife to the Reel Choosing Cutting Unit Attitude Leveling the Front Roller to the Reel Adjusting the Height of the Top Shield Adjusting the Top Bar Adjusting the Height of Cut Operation Cutting Unit Characteristics Cutting Unit Daily Adjustments Maintenance Greasing Bearings and Bushings Backlapping the Cutting Units Page 2 2 2 3 3 4 4 5 5 5 6 6 6 6
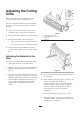
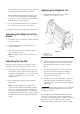
Adjusting the Cutting Units 3 4 3 Note: Determine the left and right sides of the machine from the normal operating position. After the cutting unit is unboxed, use the following procedures to assure the cutting units are adjusted properly. 2 1. Check each end of the reel for grease. Grease should be visibly evident in the reel bearings. Figure 2 1. 2. 3. 4. 2. Insure that all nuts and bolts are securely fastened. 3. Position the lift roller to match suspension.
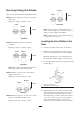
Choosing Cutting Unit Attitude Bracket There are four positions for the front roller brackets. Frame Down Position 1: Least aggressive; use for very soft and tender turf. Height-of-cut range: 2.4mm–21,3mm POSITION 4 Frame Bracket Note: A more aggressive setting will increase Down grass removal and provide a cleaner cut, but may cause increased scalping and marking. Note: A more aggressive setting will be required to compensate for reel wear. POSITION 1 conditions.
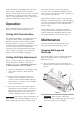
The dot indicates in which direction the right end of the roller moves when the bolt is turned. Adjusting the Height of Cut 1. Verify that the front roller is level and the bedknife-to-reel contact is correct. Note: If additional adjustment is required, replace one screw on the left-hand bracket with another bolt, part no. 93-2573. Make sure that both front roller brackets are in the same hole. 5. To verify whether the roller is level, try inserting a piece of paper under each end of the roller. 6.
edges will result after a period of operation. If excessive contact is maintained, bedknife/reel wear will accelerate, uneven wear can result, and quality of cut may be adversely affected. of the cutting units and bedknife profile. Therefore, bench setting a cutting unit does not equal the effective (actual) height of cut you achieve. You must determine how to adjust your cutter on the bench to achieve a comparable height of cut to a cutting unit of a different configuration, model, or brand.
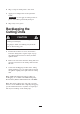
2. Wipe each grease fitting with a clean cloth 3. Apply grease until pressure is felt against the handle. Important : Do not apply too much pressure or grease seals will be permanently damaged. 4. Wipe away excess grease. Backlapping the Cutting Units CAUTION Contact with the reels or other moving parts can result in personal injury. Keep fingers, hands, and clothing away from the reels or other moving parts. 1.