
Operator's Manual

of the cutting units and bedknife profile. Therefore,
bench setting a cutting unit does not equal the
effective (actual) height of cut you achieve. You must
determine how to adjust your cutter on the bench to
achieve a comparable height of cut to a cutting unit of
a different configuration, model, or brand.
Operation
Note: Determine the left and right sides of the
machine from the normal operating position.
Cutting Unit Characteristics
The single-knob bedknife-to-reel adjustment system
incorporated in this cutting unit simplifies the
adjustment procedure needed to deliver optimum
mowing performance. The precise adjustment
possible with the single knob/bedbar design gives the
necessary control to provide a continual self-
sharpening action, thus maintaining sharp cutting
edges, assuring good quality of cut, and greatly
reducing the need for routine backlapping.
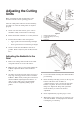
Cutting Unit Daily Adjustments
Prior to each day's mowing, or as required, each
cutting unit must be checked to verify proper
bedknife-to-reel contact. This must be performed
even though quality of cut is acceptable.
1. Lower the cutting units onto a hard surface, shut
of the engine and remove the key from the
ignition.
2. Slowly rotate the reel in reverse direction,
listening for reel-to-bedknife contact. If no
contact is evident, turn the bedknife adjusting
knob clockwise, one click at a time, until light
contact is felt and heard.
3. If excessive contact is felt, turn the bedknife
adjusting knob counterclockwise, one click at a
time until no contact is evident. Then turn the
bedknife adjusting knob one click at a time
clockwise,until light contact is felt and heard.
: Light contact is preferred at all times. If
light contact is not maintained, bedknife / reel edges
will not sufficiently self-sharpen and dull cutting
edges will result after a period of operation. If
excessive contact is maintained, bedknife/reel wear
will accelerate, uneven wear can result, and quality of
cut may be adversely affected.
Note: As the reel blades continue to run against the
bedknife, a slight burr will appear on the front cutting
edge surface the full length of the bedknife. Running a
file across the front edge to remove this burr will
improve cutting.
After extended running, a ridge will eventually
develop at both ends of the bedknife. These notches
must be rounded off or filed flush with the cutting
edge of the bedknife to assure smooth operation.
Maintenance
Note: Determine the left and right sides of the
machine from the normal operating position.
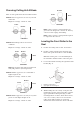
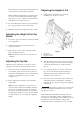
Greasing Bearings and
Bushings
Each cutting unit has (7) grease fittings that must be
lubricated regularly with No. 2 general purpose
lithium-base grease.
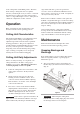
1. The grease fitting locations and quantities are:
Reel bearings (2) and front and rear rollers (2 ea.)
(Fig. 6).
Figure 6
: Lubricating the cutting units
immediately after washing helps purge water from
the bearings and increases bearing life.
Important
Important
6