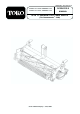
FORM NO. 3323-363 Rev A MODEL NO. 04480 200000001 & UP MODEL NO.
Table of Contents Specifications Adjusting the Cutting Unit Adjusting the bedknife to the Reel Leveling the Front Roller to the Reel Adjusting Shield Height Page 2 3 4 4 5 Adjusting Top Bar Adjusting Height-of-Cut Cutting Unit Daily Adjustments Lubrication Greasing Bearings And Bushings Backlapping the Cutting Units 5 5 6 6 6 7 Specifications have a replaceable roller that may be moved to change transport height.
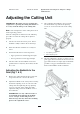
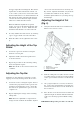
Full front roller Model No. 04486 Specifications and design are subject to change without notice. Adjusting the Cutting Unit IMPORTANT: Read this operator's manual thoroughly before operating the cutting unit. Failure to do so may result in damage to the cutting unit. 3. After adjusting the bedknife to the reel, make sure that both the top and bottom adjusting screws are secured on both ends of the cutting unit. Note: Left and right sides of the cutting unit refer to normal operating position.
Height-of-cut range: 2.4mm–19mm Choosing Cutting Unit Attitude Bracket There are four positions for the front roller brackets. Position 1: Least aggressive; use for very soft and Frame Down tender turf. Height-of-cut range: 3.2mm–26mm Frame Bracket POSITION 4 Down Note: A more aggressive setting will increase grass removal and provide a cleaner cut, but may cause increased scalping and marking. Note: A more aggressive setting will be required POSITION 1 to compensate for reel wear.
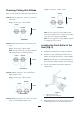
the upper right roller mounting bolt. This mounting bolt has an offset, which when rotated, acts as an eccentric (cam) to raise or lower the roller. On the bolt head there is an internal diameter dot that denotes the offset of the bolt. The dot indicates the direction in which the right end of the roller moves when the bolt is turned. closer to the reel when the turf is extremely wet. By contrast, adjust the bar further away from the reel when turf conditions are dry.
of the bedknife and tighten locknuts that retain rear roller brackets on each end. ting unit attitude, cutting unit accessories, weight of the cutting units and bedknife profile. Therefore, bench setting a cutting unit does not equal the effective (actual) height of cut you achieve.
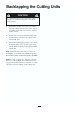
Backlapping the Cutting Units CAUTION Be careful when lapping the reel because contact with the reel or other moving parts can result in personal injury. 1. Position the machine on a clean, level surface, lower the cutting units, stop the engine, engage the parking brake and remove the key from the ignition switch. 2. Remove the reel motors from the cutting units and disconnect and remove the cutting units from the lift arms. 3.