TABLE OF CONTENTS Page No. SPECIFICATIONS .2 ADJUSTING THATCHING UNIT .. .2 Adjusting Reel Blades for Positive Setting 2 Adjusting Reel Blades for Negative Setting 3 Adjusting Front Grass Shield . .3 Adjusting Rear Deflector .3 Adjusting Front Roller Scraper .3 Adjusting Rear Wheel Scrapers 4 Installing Thatching Unit OPERATION Training Priced Operating Tips Adjust Carrier Frame Rollers . Adjust Reel Circuit Relief Valve . Optional Blade Configurations . MAINTENANCE Lubrication . .
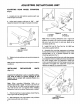
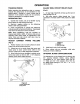
ADJUSTING THATCHING UNIT ADJUSTING REEL BLADES NEGATIVE SETTING (Below ground) (Fig. 2) Note: Maximum negative setting is 5/8” deep blade penetration. FOR 1. Place thatcher unit on level surface. 2. Loosen the {2) lockouts on carriage bolts securing rear wheel brackets to thatcher frame. 3. Place (2) gauge bars, which have the desired depth of bias penetration below ground, under the front roller and rear wheels of thatcher unit. Figure 2 1, Rear wheel brackets 2. Gauge bars 3. Adjusting cap screw 4.
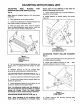
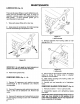
ADJUSTING THATCHING UNIT ADJUSTING REAR WHEEL SCRAPERS (Fig. 5) 1. Loosen jam nut and lockout securing each rear wheel scraper to bracket. 2. Adjust sate scraper until there is 030" ~ .060" clearance between front edge of scraper and wheel. Figure 5 1. Rear wheel scraper 2. Jam nuts 3. Tighten lockouts and jam nuts securing scrapers to brackets. Note: Scraper adjustment can be changed to meet turf conditions. INSTALLING (Fig.
OPERATION TRAINING PERIOD Before operating the thatching units on a green, evaluate the performance of the thatcher at the desired setting. Operate in a clear, unused area to determine if the desired results will be achieved. Adjust the thatcher if a change is desired. OPERATING TIPS 1. Q Operate the traction unit at full throttle varying ground speed to meet thatching loads. 2. Maximum negative setting on the thatcher blades is 5/8” deep penetration. 3.
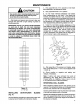
MAINTENANCE LUBRICATION (Fig. 10) There are (6) grease fittings on each thatching unit, which must be lubricated after every 15 hours of operation, Lubricate using a #2 multipurpose lithium base grease. A hand operated grease gun is recommended for best results. 1. Wipe each grease fitting with a clean rag. 2. Apply grease to reel bearings, front roller bearings and rear wheel bearings until pressure is fat. Figure 10 IMPORTANT: Do not apply too much pressure or grease seals will be permanently damaged. 3.
MAINTENANCE A caution Use caution when removing blades from shaft as they are extremely sharp and may have burrs that will cut your hands. 3. After blades and spacers are removed, clean and lubricate hex shaft with a light coating of grease to simplify assembly. IMPORTANT: The two 1/4” spacers must assembled on each end of shaft. Do not invert individual thatching reel blades. The order of disassembly is extremely important.
MAINTENANCE Check positive or negative reel setting and readjust, it necessary. IMPORTANT: Make sure the sharp edge of the blades are in the direction of the rotation of the thatching unit. ASSEMBLE REEL TO FRAME 1. Slide a locking collar onto each end of reel shaft. Larger L.D. of collar to be facing outward. 2. Insert reel shaft assembly into frame. 3. Install and secure a reel bearing housing to each end of thatcher unit with cap screws and lock washers previously removed. 4.