
Operator's Manual


Maintenance
Note:Determinetheleftandrightsidesofthemachine
fromthenormaloperatingposition.
ServicingtheBedbar
RemovingtheBedbar
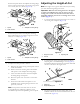
1.Turnthebedbaradjusterscrewcounterclockwise,to
backthebedknifeawayfromthereel(Figure19).
Figure19
1.Bedbaradjustingscrew3.Bedbar
2.Springtensionnut
4.Washer
2.Backoutthespringtensionnut,untilthewasherisno
longertensionedagainstthebedbar(Figure19).
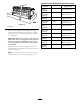
3.Oneachsideofthemachine,loosenthelocknut
securingthebedbarbolt(Figure20).
Figure20
1.Bedbarbolt2.Locknut
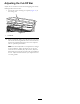
4.Removeeachbedbarboltallowingthebedbartobe
pulleddownwardandremovedfromthemachine
bolt(Figure20).Accountforthetwonylonandone
stampedsteelwashersoneachendofthebedbar
(Figure21).
g020056
Figure21
1.Bedbarbolt
3.Steelwasher
2.Locknut4.Nylonwasher
AssemblingtheBedbar
1.Installthebedbar,positioningthemountingears
betweenthewasherandbedbaradjuster.
2.Securethebedbartoeachsideplatewith2bedbar
bolts,locknuts(nutsonbolts),and6washers.Position
anylonwasheroneachsideofthesideplateboss.
Placeasteelwasheroutsideoftheouternylonwasher
(Figure21).
3.Torquethebedbarboltsto27-36N-m(240-320
inch-lb).
4.Tightenthelocknutsequallyoneachsideuntilyou
cannotrotatethesteelwashersbyhand(Figure21).
5.Loosenthelocknutsjustuntilyoucanrotatethesteel
washersbyhandandyetthereisnoendplayinthe
bedbar.
Important:Ifyouovertightenthelocknuts,you
maydeectthesideplateswhichcouldinterfere
withthebedknifetoreelcontact.
Note:Thewashersontheinsidemayhaveagap.
6.Tightenthespringtensionnutuntilthespringis
collapsed,thenbackitoff1/2turn(Figure22).
12