
Installation Instructions


1
PreparingtheMachine
NoPartsRequired
Procedure
1.Parkthemachineonalevelsurface.
2.Engagetheparkingbrake.
3.Shutofftheengine.
4.Removethespark-plugwirefromthesparkplug;
refertoyourOperator’sManual.
2
PreparingtheCuttingUnit
NoPartsRequired
Procedure
1.Onthecuttingunit,loosenthemountingscrews
thatsecureeachendofthefrontrollertothe
height-of-cutarms(Figure2).
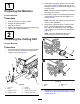
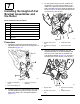
g275540
Figure2
1.Plowbolt5.Washer
2.Roller6.Flangenut
3.Height-of-cutarm
7.Roller-mountingscrew
4.Adjustingscrew
8.Cutting-unitassembly
2.Removetheplowbolts,washers,andlocknuts
securingtheheight-of-cutarmstoeachendof
cuttingunit(Figure2).Removetheheight-of-cut
armsandroller.
Note:Savetheremovedhardwaretoinstallthe
newheight-of-cutarms.
3.Removetheheight-of-cutadjustingscrewsand
roller-mountingscrewsfromtheheight-of-cut
arms(Figure3).
Note:Savetherollermountingscrewsandthe
rollerforlaterinstallation.
4.Removethe2bolts(5/16x2-1/4inches)from
the2nuts(heldcaptivebythesideplate)
securingthecounterweightonthesideplate
ofthecuttingunit.Removethecounterweight
(Figure3).
Note:Youmaydiscardthecuttingunit
counterweightandthemountingbolts.
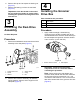
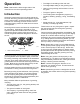
g281094
Figure3
1.Weight3.Bearingnut
2.Bolt
4.Cap
5.Restrainthereeltoremovethebearingnut;refer
toRestrainingtheReelforRemovingThreaded
Inserts(page15).
3