Form No. 3443-670 Rev A Spiker Greensmaster® 3300/3400 Series TriFlex® Traction Unit Model No. 04723—Serial No. 406000000 and Up Register at www.Toro.com.
This product complies with all relevant European directives. For details, please see the Declaration of Incorporation (DOI) at the back of this publication. This spiker is designed for cutting turf on greens and small fairways of golf courses. Using this product for purposes other than its intended use could prove dangerous to you and bystanders. Read this information carefully to learn how to operate and maintain your product properly and to avoid injury and product damage.
Spiker Safety Safety • The spiker is only a part of a complete machine when installed on a traction unit. Read the traction unit Operator’s Manual carefully for complete instructions on the safe use of the machine. General Safety This product is capable of amputating hands and feet. Always follow all safety instructions to avoid serious personal injury.
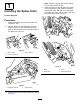
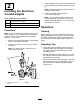
Note: When the latches are properly locked, you can hear and feel a click. 1 4. Installing the Spiker Units Insert the motor into the left side of the spiker unit (as viewed from the operator’s position), and pull the motor retaining bar on the spiker unit toward the motor until you hear a click from both sides of the motor (Figure 5). No Parts Required Procedure 1. Position the spiker unit under the traction-unit suspension arm. 2.
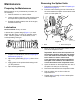
3. 2 Note: The washers (Part No. 63-8410) are not included with the spiker. Installing the Electrical Counterweights 4. Counterweight (not included) 6 Bolts (not included) 24 Washer (not included) Install the auxiliary weight (Part No. 117-6774-03) with bolts. Note: You can use the auxiliary weight and Parts needed for this procedure: 3 Install 4 washers (1/8 inch) per bolt between the counterweight and the spiker side plate (Figure 6).
Maintenance Removing the Spiker Units 1. Prepare for maintenance; refer to Preparing for Maintenance (page 6) 2. Push the motor retaining bar out of the slots on the motor toward the spiker unit and remove the motor from the spiker unit. Preparing for Maintenance Before starting on any maintenance procedure, do the following: 1. Park the machine on a level surface. 2. Lower the spiker units fully to the ground so that the suspension hydraulics are fully extended. 3.
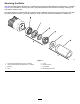
Servicing the Roller The Greens Roller Rebuild Kit (Part No. 140-5552) and the Greens Roller Rebuild Tool Kit (Part No. 140-5553) (Figure 9) are available for servicing the roller. The Roller Rebuild Kit includes all the bearings, bearing nuts, and seals to rebuild a roller. The Roller Rebuild Tool Kit includes all the tools and the installation instructions required to rebuild a roller with the roller rebuild kit. Refer to your parts catalog or contact your authorized Toro distributor for assistance.
Notes:
Declaration of Incorporation The Toro Company, 8111 Lyndale Ave. South, Bloomington, MN, USA declares that the following unit(s) conform(s) to the directives listed, when installed in accordance with the accompanying instructions onto certain Toro models as indicated on the relevant Declarations of Conformity. Model No. 04723 Serial No.
EEA/UK Privacy Notice Toro’s Use of Your Personal Information The Toro Company (“Toro”) respects your privacy. When you purchase our products, we may collect certain personal information about you, either directly from you or through your local Toro company or dealer.
The Toro Warranty Two-Year or 1,500 Hours Limited Warranty Parts Conditions and Products Covered The Toro Company warrants your Toro Commercial product (“Product”) to be free from defects in materials or workmanship for 2 years or 1,500 operational hours*, whichever occurs first. This warranty is applicable to all products with the exception of Aerators (refer to separate warranty statements for these products).