
Operator's Manual


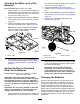

3.Connecta16gauge(orlargerdiameter),
2.5m(8.2ft)orshorterchargercordtothe
chargingreceptacleonthemachine(Figure38).
Note:Ensurethatthecharger-voltagesetting
matchesthevoltageatthepoweroutletbeing
used.
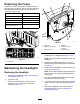
Note:Inhigh-ambienttemperature
environments,removetheseatassemblyfor
optimalchargingtime;refertoRemovingthe
SeatAssembly(page29).Ifthebatterycharger
istoohot,itmaynotchargeproperly.Incold
temperatures,itmaytakealongerforthe
batteriestocharge.
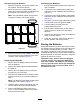
g034217
Figure38
1.Charger-statuslight
4.Thebatteryisalmost
charged.
2.Chargingreceptacle
5.Thebatteryischarged.
3.Thebatteryisnearempty.
6.Chargerfault;refertothe
chargermanualforthe
faultcodes.
4.Plugthechargerpowercordintothepower
outlet.
Note:Whilethebatteriesarecharging,the
greenlightonthechargerblinksonandoff.
Whenthebatteriesarefullycharged,thegreen
lightstopsblinkingandstayson.
5.Disconnectthecordfromthepoweroutlet.
6.Disconnectthechargerfromthemachine.
RefertothefollowingtableandFigure38for
informationonthemeaningsofthevaryingcolorsof
thecharger-statuslight.
Charger-StatusLightTable
Charger-Status
LightColor
Solid/Flashing
Meaning
GreenSolidChargingcomplete
Green
Flashing
Shortash—less
than80%charge
Long
ash—greaterthan
80%charge
AmberFlashingReduced-power
mode—lowAC
voltageorhigh
internalcharger
temperature;
chargeimmediately
RedFlashing
Charger
error—resetthe
chargerpower
Ifthiserrorpersists,
refertotheblink
codesinthe
chargermanual
36