
Operator's Manual


#$ %! #$"%$ #
" & $&$ "
$$"( 7,-4 764@
If Battery is not filled with electrolyte or activated,
bulk electrolyte with 1.260 specific gravity must be
purchased from a local battery supply outlet and
added to battery.
%$
'-)9 :).-;@ /7//4-: )6, 9<**-9 /47=-:
>0-6 >79316/ >1;0 -4-+;974@;- 0)9/- ;0-
*);;-9@ 16 ) >-44 =-6;14);-, 84)+- :7 /)::-:
897,<+-, >014- +0)9/16/ +)6 ,1::18);-
#16+- ;0- /):-: )9- -?847:1=- 3--8 78-6
.4)5-: )6, -4-+;91+)4 :8)93 )>)@ .975 ;0-
*);;-9@ ,7 67; :573- )<:-) 5)@ 9-:<4;
1. ;0- /):-: )9- 160)4-, %684</ +0)9/-9
.975 -4-+;91+)4 7<;4-; *-.79- +766-+;16/ ;7
79 ,1:+766-+;16/ +0)9/-9 4-),: .975 *);A
;-9@ 87:;:
Unhook springs from battery cover, remove cover
and lift battery out of battery box.
Remove filler caps from battery and slowly fill each
cell until electrolyte is up to fill line.
Replace filler caps and connect a 3 to 4 amp
battery charger to the battery posts. Charge the battery
at a rate of 3 to 4 amperes for 4 to 8 hours.
When battery is charged, disconnect charger from
electrical outlet and battery posts. Allow battery to sit
for 5 to 10 minutes before proceeding to next step.
Remove filler caps and slowly add electrolyte to
each cell until level is up fill line. Install filler caps.
! "$$: 7 67; 7=-9.144 *);;-9@ 4-+;974@;- >144
7=-9.47> 76;7 7;0-9 8)9;: 7. ;0- 5)+016- )6,
:-=-9- +7997:176 )6, ,-;-9179);176 >144 9-:<4;
#$ $$"( 7,-4 764@
Slide the battery into battery box with the terminals
to the inside.
Attach the negative cable (wire from engine block)
to the negative (-) terminal of the battery.
Attach the positive cable (wire from ignition switch)
to the positive (+) terminal.
Coat the terminals and mounting fasteners with
petroleum jelly to prevent corrosion.
Install battery cover and secure with springs.
'"
766-+;16/ +)*4-: ;7 ;0- >976/ 87:;
+7<4, 9-:<4; 16 8-9:76)4 162<9@ )6,79
,)5)/- ;7 ;0- -4-+;91+)4 :@:;-5 )3-
:<9- *);;-9@ 79 +)*4-: ,7 67; 16;-9.-9- 79
9<* 76 )6@ 57=16/ 79 07; 8)9;:
%$ #'!" $ !" &"
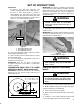
1/
To assure proper debris pickup, make sure sweeper
frame is parallel with the ground.
Position sweeper on a flat, level surface.
Insert sweeper jack caster wheel onto sweeper
end of jack tube.
Adjust sweeper jack so distance from top of frame
to ground is approximately 23-1/2".
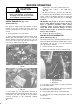
#>--8-9 2)+3
1;+0 ;76/<- 7,-4
,2<:;16/ :+9->:
1/<9-
Back prime mover up to sweeper.
Adjust sweeper hitch tongue to same level as hitch
of prime mover as follows:
7,-4 -
Remove capscrews and locknuts securing
hitch tongue to frame (Fig. 1).
Raise or lower hitch tongue to position
approximately level with prime move hitch and
secure with (2) capscrews and locknuts.