
Installation Instructions


LooseParts
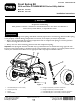
Usethechartbelowtoverifythatallpartshavebeenshipped.
ProcedureDescription
Qty.
Use
1
Nopartsrequired
–
Preparethemachine.
2
Nopartsrequired
–
Removethestrutassembly.
3
Spring
2Installthesprings.
4
Nopartsrequired
–
Installthestrutassembly.
1
PreparingtheMachine
NoPartsRequired
Procedure
1.Parkthemachineonalevelsurface,settheparking
brake,shutofftheengine,andremovethekey.
2.Disconnectthenegativebatterycable;refertoyour
Operator’sManual.
3.Raisethefrontofthemachine.
2
RemovingtheStrutAssembly
NoPartsRequired
Procedure
1.Removethefrontwheel.
2.Removethehex-headbolt(3/8x4-3/4inches)and
angenut(3/8inch)fromthespindle(Figure1).
3.Removethehex-headbolt(3/8x3-1/2inches)and
angenut(3/8inch)fromthecontrolarm(Figure1).
4.Removethehex-headbolt(1/2x2-1/4inches)and
locknut(1/2inch)securingthestrutassemblytothe
upperframe(Figure1).
5.Removethestrutassembly(Figure1).
Note:Repeatthisprocedurefortheothersideofthe
machine.
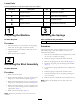
3
InstallingtheSprings
Partsneededforthisprocedure:
2
Spring
Procedure
UseanapprovedTorospring-compressiontooltoremove
andinstallspringsofthestrutassembly.Contactyour
AuthorizedToroDealer.
1.Placethestrutassemblyintothecompressiontooland
usethetooltocompressthespring.
2.Whilethespringiscompressed,removethecollar.
3.Removethespringfromthestrutassembly(Figure1).
4.Installthenewspringovertheexistingstrutassembly
(Figure1).
5.UsingtheTorospring-compressiontool,compressthe
spring.
6.Whilethespringiscompressed,installthecollar.
7.Carefullyreleasepressureonthespring,allowingitto
seatonthecollar.
8.Removethestrutassemblyfromthecompressiontool.
Note:Repeatthisprocedurefortheothersideofthe
machine.
2