
Operator's Manual
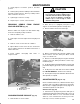
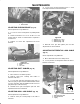

Remove drain plug (Fig. 51) from side of reservoir
and let hydraulic fluid flow into drain pan.
Remove hydraulic line and fitting connected to
strainer on side of reservoir.
Remove strainer and clean by back flushing with a
clean degreaser. Allow to air dry before reinstalling.
)'41&
5%1"4,)$ 231").&1
Reinstall strainer.
Reinstall hydraulic line and fitting to strainer.
Reinstall and tighten drain plug.
Fill reservoir with approximately 7.5 qt. of Dexron IIl
ATF. Refer to Checking Hydraulic Fluid.
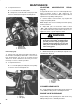
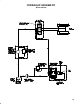
! )'
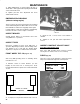
Check adjustment every 200 hours.
Loosen jam nut on link rod ball joint.
Rotate rod until gap between brake pedal and up
stop is .020-.080".
)'41&
).+ 1/% #",, */).3
Tighten jam nut after adjustment has been
attained.
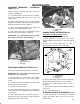
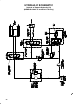
)'41&
1"+& 0&%",
,43$( 0&%",
,43$( 0&%", 40 23/0
! ! )'
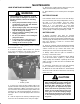
Check adjustment every 200 hours.
Loosen jam nuts securing clutch cable to bracket
on bell housing.
/3& Ball joint may be removed and rotated If
additional adjustment is required.
Disconnect return spring from clutch lever.
Adjust jam nuts and/or ball joint until bottom rear
edge of clutch pedal is 4.25" +
.12" from top of floor
plate diamond pattern, when an 4 lb. force is applied to
pedal.
/3& Force is applied so release bearing lightly
contacts pressure plate fingers.
Reconnect return spring to clutch lever.
Verify that rear edge of clutch pedal is 5.5" +
.12"
from top of floor plate diamond pattern. If dimension is
not attained, adjust clutch pedal up stop.
/3& Clutch free play should never be less than .75" .
)'41&
,43$( $"#,&
"- .432
&341. 201).'
",, */).3
Tighten jam nuts after adjustment has been
attained.
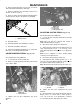
Recheck clutch safety switch adjustment (Fig. 58).
Engine must not crank unless clutch pedal is
1.25" ±.25" from floor. If an adjustment is required,
loosen switch jam nuts and adjust up or down.