
Installation Instructions
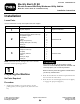
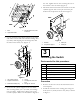
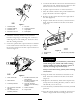
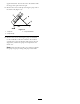


Figure7
1.Solenoidplate5.Nut,#10
2.Solenoid,existing
6.Accessoryharness
3.Solenoid,new
7.Largeposts
4.Bolt,#10x3/4inch8.Smallposts
3.Attachtheaccessoryharnesstothesolenoid.
Connectalargeringtoeachlargepost.Connecta
smallringwiretoeachsmallpost.Securethewires
withtheexistingfasteners.
4.Locatetheoptional48voutputconnectoraslabeled
onthemainharnessandremovethecap.Connect
theaccessoryharnesstothe48voutputconnectoras
shownin
Figure8.
Figure8
1.Dash,underside
6.Boxliftkitconnector,from
mainharness
2.Mainharness
7.Boxliftkitconnector,from
accessoryharness
3.Accessoryharness
8.Cap48vconnector
extension,fromaccessory
harness
4.48vconnector,frommain
harness
9.Switchconnector
5.48vconnector,from
accessoryharness
10.Plugindash
5.Locatetheboxliftkitconnectoronthemainharness
andremovethecap.Attachaccessoryharnesstobox
liftkitconnector.wirefrommainharness.
6.Cap48voutputconnectoronaccessoryharness.
7.Placetheswitchconnectorintopositionbehindthe
pluginthedashasshownin
Figure8.
8.Removetheplugfromtheholeintherightsideof
thedash(Figure9).
9.Plugtheswitchintotheaccessoryconnectorinthe
dash.Inserttheswitchintotheholeinthedash
(
Figure9).
Figure9
1.Pluggedhole
3.Cutnewhole(ifrequired).
2.Switch
WARNING
Looseorimproperlysecuredbatteryconnections
coulddamagethevehicleandcablescausing
sparks.Sparkscancausethebatterygassesto
explode,resultinginpersonalinjury.
Alwaysensurethebatterypolaritywhenmaking
connections.
10.Plugtheswitchintotheharnessconnectorinthe
dash.Inserttheswitchintotheholeinthedash
(Figure9).
11.Replacetheshortbatterycableremovedpreviously.
Torquethenutssecuringallbatterycablesto120to
180inch-lb(13.5to21N⋅m).
12.CoatthebatteryterminalswithTorobatteryterminal
protector.
13.Presstheswitchupwardtoextendtheactuatorrod
untilitisalignedwiththemountingholesinthe
4