
Installation Instructions

W 2004 by The Toro Company
8111 Lyndale Avenue South
Bloomington, MN 55420-1196
Contact us at www.Toro.com
All Rights Reserved
Printed in the USA
Original Instructions (EN)
12V Converter Kit
Workman e2050 Utility Vehicle
Model No. 107-0684–Serial No. 240000001 and Up
Form No. 3353-359 Rev A
Installation Instructions
Note: Determine the left and right sides of the traction unit from the operator’s position.
Loose Parts
Description Qty. Use
Converter mount
Converter
Electrical Mount
Flange bolt, 1/4 x 3/4 inch
Locknut, 1/4 inch
Bolt, 5/16 x 3/4 inch
Locknut, 5/16 inch
Fuse assembly
Power point assembly
Bolt, 3/8 x 1 inch
Wiring harness
Wire ties
1
1
1
4
4
1
1
1
1
2
1
4
Install the 12V converter kit
Preparing the Machine
1. Position the vehicle on a level surface, engage the
parking brake and rotate the On/Off key to the Off
position.
Batteries can give you a powerful electrical shock.
• Use tools with plastic handles or wrap the
handles of metal tools with electrical tape.
• Be careful not to contact both a positive
terminal and a negative terminal at the same
time.
Caution
2. Remove front hood to gain access to front end of the
machine.
Installing the 12V Converter Kit
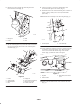
3. Assemble the 12V converter to the converter mount
plate (Fig. 1). Make sure the converter is orientated
with the mount plate as depicted.
4. Secure the converter to the mount plate using four bolts
(1/4 x 3/4 inch) and four locknuts (1/4 inch) as shown
in Figure 1.
1
2
3
4
m–7736
Figure 1
1. Converter
2. Mount plate
3. Bolt,
4. Tension wheel
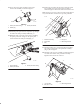
5. Remove the nut and bolt securing the horn to the
steering column under the dash. Let the horn hang and
replace the fasteners just removed.