
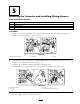
Installation Instructions


Note: Orientate the flat connector so that is facing the dri v er seat.
4. Locate the 12V po w er plug wire har ness and locate the flat connector at one end of the har ness .
4.
1.
5.
2.
6.
3.
7.
123
4
6
7
5
G005404
5
8 9
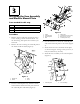
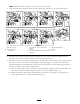
Figure 11
1. Bolt (3/8 x 1 inch)
4. Flat connector, 12V converter wiring
harness
7. Operator’s Manual tube
2. Lock nut (3/8 inch)
5. 5 inches 8. R-clamp
3. 12V converter
6. Drill 3/8 inch diameter hole (vehicles with
heater kit)
9. Bolt
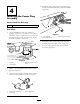
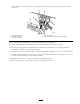
5. R oute the flat connector do wn through the pedal bo x to the 12V con v er ter assembly mounted
previously . Connect the flat connect to the 12V con v er ter ( Figure 11 ).
6. Install the Operator’ s Manual tube and R-clamps to the dash at the same location as remo v ed previously
for v ehicles without a heater kit. If installing the 12V po w er plug kit to a v ehicle with a heater kit
installed or planned to be installed, relocate the Operator’ s Manual tube . Use the follo wing procedure to
relocate the Operator’ s Manual tube and R-clamps:
A. Measure 5 inc hes left from the center line of the left side hole . Mark that location. Pilot drill a 3/8
inc h whole through the dash. Enlarg e the hole to a 3/8 inc h diameter ( Figure 11 ).
B . Install the Operator’ s Manual tube and R-clamps to the dash at new location. Use the fasteners
remo v ed previously to secure the assembly ( Figure 11 ).
6