Form No. 3393-677 Rev A Full Area Flatbed Heavy-Duty Workman® Utility Vehicle Model No. 07301—Serial No. 315000001 and Up Installation Instructions WARNING CALIFORNIA Proposition 65 Warning This product contains a chemical or chemicals known to the State of California to cause cancer, birth defects, or reproductive harm. Installation Loose Parts Use the chart below to verify that all parts have been shipped.
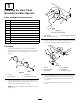
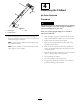
1 3 Installing the Rear Pivot Brackets and Box Spacers Parts needed for this procedure: 2 Wear block 1 Left spacer bracket 1 Right spacer bracket 2 Pivot tube 8 Bolt (3/8 x 3-3/4 inches) 14 Locknut (3/8 inch) 2 Left pivot bracket 2 Right pivot bracket 6 Carriage bolt (3/8 x 3-3/4 inches) 4 Pan head bolt 4 Locknut 1 2 g028477 Figure 2 Locknuts are not shown 1. Pivot bracket 2. Bolt—3/8 x 3-3/4 inch (3) 3. Left rear corner of the bed 3.
2 1 Installing the Flatbed 3 Parts needed for this procedure: 1 Flatbed 4 Clevis pin 8 Lynch pin 5 4 Procedure 2 g028479 Figure 4 CAUTION The flatbed is heavy—approximately 94 kg (210 lb), which can injure you if you attempt to install or remove the full bed on your own. 1. Left rear corner of the bed 4. Clevis pin 2. Vehicle frame channel 5. Lynch pin 3. Pivot bracket 3. Secure each set of pivot brackets to the frame channels with a clevis pin and 2 lynch pins (Figure 4).
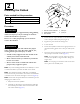
3 2 1 Using the Bed Safety Support No Parts Required 5 Procedure 4 1. Raise the bed until the cylinders are fully extended. 3 2. Remove the bed support from the storage stud on the top of the backrest support channel on the vehicle (Figure 6). g028482 Figure 5 1. Bed mounting plate 4. Clevis pin 2. Rear slots 5. Lynch pin 1 3. Cylinder rod end 8. Start the engine and engage the hydraulic lift lever to raise the bed. 9. Release the lift lever and stop the engine. 10.
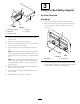
4 Removing the Flatbed 3 1 No Parts Required Procedure CAUTION 2 The flatbed is heavy—approximately 94 kg (210 lb), which can injure you if you attempt to install or remove the full bed on your own. g028481 Figure 7 1. Bed support 3. Bed Have 2 or 3 other people help you to install or remove the full bed. 2. Cylinder barrel 1. Start the engine, engage the hydraulic lift lever, and lower the bed until the cylinders are loose in the slots. 4.
Notes: 6
Declaration of Incorporation The Toro Company, 8111 Lyndale Ave. South, Bloomington, MN, USA declares that the following unit(s) conform(s) to the directives listed, when installed in accordance with the accompanying instructions onto certain Toro models as indicated on the relevant Declarations of Conformity. Model No. 07301 Serial No.
Toro General Commercial Product Warranty A Two-Year Limited Warranty Conditions and Products Covered The Toro Company and its affiliate, Toro Warranty Company, pursuant to an agreement between them, jointly warrant your Toro Commercial product (“Product”) to be free from defects in materials or workmanship for two years or 1500 operational hours*, whichever occurs first. This warranty is applicable to all products with the exception of Aerators (refer to separate warranty statements for these products).