
Operator's Manual


2
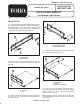
6. Insert tailgate pivot shaft into right rear pivot
bracket. Position left side panel onto bed while sliding
front end tab over front pivot bracket (Fig. 5).
Figure 5
1
2
3
1. Tailgate
2. Left side panel
3. Left rear pivot bracket
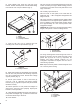
7. Insert a 5/16-18 x 7/8" lg. capscrew into rear
mounting hole of left rear pivot bracket (Fig. 6).
Figure 6
1. Left rear pivot bracket
1
8. Slide pivot bracket over left tailgate pivot shaft and
into left rear side panel tab while inserting capscrew
into rear mounting hole of bed. Secure with a flange
(Toplok) locknut (Fig. 5).
9. Secure pivot bracket to side of bed with (2)
5/16-18 x 7/8" lg. capscrews and flange (Toplok)
locknuts (Fig. 5). Tighten all panel and pivot bracket
fasteners securely.
10. Check operation of side panels and tailgate to
assure they open and close properly. Adjust pivot
brackets to ease operation.
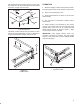
11. Open all latch assemblies and hook ends in slots in
front panel and tailgate (Fig. 7). Make sure latch ends
are hooked all the way in the slots.
12. Close latches.
13. One at a time, push each latch away from hook end
of latch end with your fingers. While holding pressure
on the latch, put a mark on the side panel at the hook
edge of the latch.
14. Carefully open each latch.
15. From mark on side panel, move each latch an
additional .060" - .080" and tighten carriage bolts and
flange locknuts.
16. Check operation of tailgate and side panels. Make
sure latches are not too tight to impair operation or too
loose so tailgate or side panels rattle. Latches should
be at approximately 45_ from closed position when
engagement begins.
CAUTION: Be careful not to pinch fingers when raising
tailgate, side panels or when actuating latches.
Figure 7
1. Latch assembly
2. Hook end of latch
1
2
17. Using mounting holes shown in figure 8, secure a
lanyard to each end of front panel and ends of side
panels with (2) 5/16-18 x 7/8" lg. capscrews, flat
washers and flange (Toplok) locknuts. Do not
overtighten capscrews as lanyard must be free to
rotate during operation.
Note: Open and close panels to assure lanyards move
out of the way when closing.
Figure 8
2
1. Front panel
2. Left side panel
3. Lanyard
1
3