
Installation Instructions


INSTALL THE RADIATOR COVER
(Required with Full-Size Flat Bed only)
IMPORTANT: Before installing a full-size flat bed to a vehi-
cle, a radiator cover (included with the full-size flat bed)
must be installed to prevent sand, dirt, etc., spilling over the
front of the bed and entering the radiator.
1. Remove the capscrew securing the top left corner of the
radiator to the vehicle frame (as viewed from the driver’s
position on the seat).
2. Mount the left-hand cover bracket to the frame with (2)
5/16-18 x 5/8” capscrews and locknuts (supplied with the
kit).
3. Repeat steps 1 and 2 on the right-top side of the radiator.
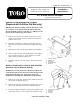
4. Insert a swell latch into each mounting hole of the radiator
cover as shown in figure 1. Secure latches to each side
with a rubber grommet and plastic nut.
5. Install the radiator cover onto the new brackets and secure
latches.
INSTALL REAR PIVOT PLATES & BOX SPACERS
(Required only on Workman 3300-D)
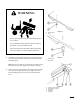
WARNING: Lowering the bed on a Workman 3300-D will
crush the fuel injector lines and cause serious damage to the
engine unless the higher rear pivot plates and spacers
(included with the Workman 3300-D) have been installed.
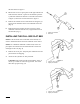
1. Remove the clevis pins and lynch pins installed to the bed
pivot plates for shipping (Fig. 2).
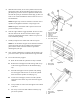
2. Remove the capscrews and locknuts securing the rear pivot
plates to the right and left bed frame channels (Fig. 3).
3. Loosely assemble the higher rear pivot plates together with
a pivot tube, 3/8-16 x 3-3/4” capscrew and locknut, using
Figure 1
1. Left cover bracket
2. Radiator cover
3. Swell latch
4. Rubber grommet
5. Plastic nut
Figure 2
1. Left rear corner of bed
2. Pivot plate
3. Clevis pin
4. Lynch pin
Installation
Instructions
FORM NO. 3318-395 GB Rev A
MODEL NO. 07301—60001 & UP
MODEL NO. 07321—6
0001 & UP
For the Workman 3000 Series
2
⁄3- & Full-Size Flat Bed
®
© The Toro Company—1996