Form No. 3412-977 Rev A Canopy Kit Workman® MD/MDX/MDE Utility Vehicle Model No. 07324 Installation Instructions WARNING CALIFORNIA Proposition 65 Warning This product contains a chemical or chemicals known to the State of California to cause cancer, birth defects, or reproductive harm. © 2016—The Toro® Company 8111 Lyndale Avenue South Bloomington, MN 55420 Register at www.Toro.com.
Safety Safety and Instructional Decals Safety decals and instructions are easily visible to the operator and are located near any area of potential danger. Replace any decal that is damaged or missing. decal115-7670 115-7670 1. Crushing hazard, rollover—read the Operator’s Manual; ROPS must be installed for effective rollover protection; the canopy alone does not protect in case of a rollover.
Installation Loose Parts Use the chart below to verify that all parts have been shipped. Description Use Qty.
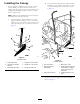
Installing the Canopy B. 1. If your machine is equipped with a rollover prtection system (ROPS), you do not need to install a rear support tube; proceed to step 3. If your machine is not equipped with a ROPS, proceed as follows to install the rear support tube: Loosely install the rear tube and support-bracket assemblies to the machine using 8 bolts (5/16 x 1 inch) and 8 flange nuts (5/16 inch) as shown in Figure 3. Note: Machines with a ROPS does not use the parts described in the following sub-steps.
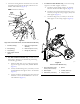
. For 2016 and After Models only, secure the canopy support to the dash support as follows: 3. Locate the existing bracket mounted to the cross tube and under the right side of the dash, and remove the bracket under the dash (Figure 4). A. Install the spacer and flat washer (11/32 inch) between the dash and dash support (Figure 5). Note: Retain the hardware. G009567 B. Install the hex-socket button head screw (5/16 x 2 inches) through the canopy support, dash, and dash support (Figure 5). C.
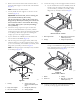
. Remove the rear bolt and nut that secure the dash to the front frame support on the left side of the machine (Figure 3). 11. Secure the canopy to the rear support frame as follows: A. If your machine does not have a ROPS, secure the canopy to the rear support tube using 2 screws (5/16 x 2 inches), 2 washers (5/16 inch), and 2 flange nuts (5/16 inch) as shown in Figure 7. Note: Retain the rear bolt and nut. 7. Loosely install the front supports to the floor of the machine (Figure 3).
Notes: