
Installation Instructions


The1/3platformliftisdesignedtobeusedonlywitha
WorkmanVehicleandmustbemountedwiththewiring
harness,level,decals,switchesandallinterlockswitches
installed.
Important:If1/3Platformliftistobeinstalled
ona4WheelDriveWorkmanVehiclewithaserial
numberof50001&Upora2WheelDriveLiquid
CooledWorkmanVehiclewithaserialnumber
of60001&Up,thebasecover,partno.93-3737,
(Figure2)mustberemovedfromliftassemblyand
a1/3CoverKit,partno.93-9225,(Figure3)must
beinstalledonvehicle.Thisistopreventdamage
totheradiatorcover(Figure4).Purchasekitfrom
yourLocalAuthorizedToroDistributor.
ThefollowingWorkmanVehiclemodelsareaffected:
07215-50001&Up
07216-50001&Up07200-60001&Up
07202-60001&Up07205-60001&Up
07206-60001&Up
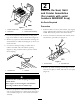
Figure2
1.Liftassemblybasecover
Figure3
1.1/3coverkit
Figure4
1.Radiatorcover
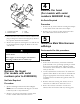
1
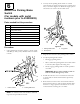
RemovetheSeat,Skirt
andFenderAssemblies
(Formodelswithserial
numberspriorto230999999)
NoPartsRequired
Procedure
1.Positionvehicleonaclean,levelsurface,stopengine,
engageparkingbrakeandremovekeyfromignition
switch.Disconnectpositivecablefrombattery.
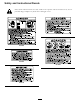
2.Unscrewandremoveallknobsfromconsolelevers.
3.Remove(6)screwssecuringoutsideedgeofcenter
consolecoverplatetoframeandremovecoverplate
(Figure5).
7