
Installation Instructions


FormNo.3373-263RevB
CanopyKit
Workman
®
HD/HDX/HDX-DUtilityVehicle
ModelNo.07372
InstallationInstructions
Note:Determinetheleftandrightsidesofthemachinefromthenormaloperatingposition.
Installation
LooseParts
Usethechartbelowtoverifythatallpartshavebeenshipped.
Description
Qty.
Use
Canopyassembly
1
Frontsupport,left
1
Frontsupport,right1
Bolt(3/8x1inch)
6
Flangenut(3/8inch)
4
Bolt(5/16x2-3/4inch)
4
Flatwasher(5/16inch)
4
Flangenut(5/16inch)
4
Clinchnuts
2
Installthecanopy.
1.Positionthemachineonalevelsurface.Settheparking
brake,turntheignitionoff,andremovethekey.
CAUTION
Ifyouleavethekeyintheignitionswitch,
someonecouldaccidentlystarttheengineand
seriouslyinjureyouorotherbystanders.
Removethekeyfromtheignitionswitch
beforeyoudoanymaintenance.
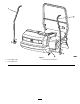
2.Looselyattachthefrontsupportstothevehicleoor
(Figure1).Securethebottomofeachtubetotheouter
edgeofthevehicleoorwithtwobolts(3/8x1inch)
andangenuts(3/8inch).
Note:Theholethroughthebottomofeachtubeis
notusedformounting.
3.Locatethecanopyassemblyinlooseparts.Locateand
removetheassembledclinchnuts,washersandbolts
securingtherearcrossbaroftheinternalcanopyframe
tothecanopy.Retainthesepartsforinstallingthe
canopytotheROPSlater.
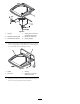
4.Mounttheclinchnutsintotheholesintheunderside
oftheROPS(
Figure3).
Note:Aheavydutyclinchnutinstallationtoolis
requiredtoproperlyinstalltheclinchnutstothe
ROPS.Example:K-LineIndustriestoolpartnumber
TOR6030.
5.Liftthecanopyupontothefrontsupports.Loosely
attachthecanopytothefrontsupportsusingfourlong
screws(5/16x2-3/4inch),fouratwashers(5/16
inch),andfourangenuts(5/16inch)(
Figure2).
Note:Thecanopysupportisalreadylooselyattached
tothecanopy(Figure2).
©2014—TheToro®Company
8111LyndaleAvenueSouth
Bloomington,MN55420
Registeratwww.T oro.com.
OriginalInstructions(EN)
PrintedintheUSA.
AllRightsReserved
*3373-263*B