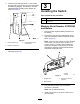
Form No. 3451-496 Rev A Electric Bed Lift Kit 2014 and After Workman® MD/MDX/MDX-D Utility Vehicle Model No. 07389—Serial No. 315000001 and Up Installation Instructions Safety Safety and Instructional Decals Safety decals and instructions are easily visible to the operator and are located near any area of potential danger. Replace any decal that is damaged or missing. decal127-7388 127-7388 1. Pin location © 2022—The Toro® Company 8111 Lyndale Avenue South Bloomington, MN 55420 Register at www.Toro.
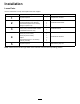
Installation Loose Parts Use the chart below to verify that all parts have been shipped. Procedure 1 2 3 4 5 Description Use Qty.
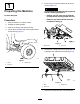
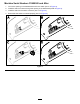
5. 1 Pull the prop rod into the detent slot to secure the bed (Figure 2). WARNING Preparing the Machine A raised bed could fall and injure persons that are working beneath it. No Parts Required • Always use the prop rod to hold the bed up before working under the bed. Procedure • Remove any load material from the bed before raising it. 1. Park the machine on a level surface. 2. Engage the parking brake. 3. Shut off the engine and remove the key. 4.
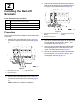
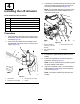
3. 2 Align the left outboard-lift bracket (the bracket with the short flanges) to the outboard holes in the upper- and lower-bed braces (Figure 5). Installing the Bed-Lift Brackets Parts needed for this procedure: 1 Outboard-lift bracket (short flanges) 1 Inboard-lift bracket (long flanges) 1 Hex-head bolt (5/16 x 5-1/2 inches) 1 Flange nut (5/16 inch) g025009 Figure 5 Procedure 1. Outboard-lift bracket (short 3.
7. Insert the hex-head bolt (5/16 x 5-1/2 inches) through hole 8 mm (5/16 inch) in the inboard-lift bracket (long flanges), bed structure, and the outboard bed-lift bracket (short flanges) as shown in Figure 6. 3 Installing the Switch Parts needed for this procedure: 1 Switch 1 Fuse (15 A)—machine serial number 411599999 and before only Machine Serial Number 411599999 and Before 1. Disconnect the negative-battery terminal from the battery. 2.
Machine Serial Number 411600000 and After 1. Cut out the opening in the dashboard decal for the switch (box A of Figure 8). 2. Install the switch connector through the opening in the dashboard (box B of Figure 8). 3. Install the switch to the switch connector (box C of Figure 8). 4. Ensure that the switch is oriented properly (box D of Figure 8).
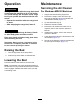
3. 4 Connect the 2-socket electrical connector of the rear wire harness of the machine to the 2-pin connector of the lift actuator (Figure 10). Note: The 2-socket electrical connector of the Installing the Lift Actuator rear wire harness is located adjacent to the electrical-control cover. Parts needed for this procedure: 1 Lift actuator 1 Clevis pin (3-1/2 inches) 1 Clevis pin (2-1/4 inches) 2 Hairpin 1 Hex-head bolt (1/2 x 5-1/2 inches) 1 Locknut (1/2 inch) Procedure 1.
7. Press the up paddle the bed-lift switch to extend the rod of the lift actuator rod until the hole in the rod is aligns with the holes in the inboard and outboard-lift brackets (Figure 11). 5 Removing the Prop Rod Note: Select the set of holes in the bracket for the gasoline and diesel machines; refer to Safety and Instructional Decals (page 1) for the hole locations for this machine. No Parts Required Procedure 1.
Maintenance Operation Servicing the Air Cleaner WARNING Driving the machine with the cargo bed raised could cause the machine to tip or roll easier. You could damage the structure of the cargo bed if you operate the machine with the bed raised. For Workman MDX-D Machines 1. Support the bed with lifting equipment. 2. • Operate the machine when the cargo bed is down. Remove the hairpin cotter and clevis pin securing the actuator rod to the inboard and outboard-lift brackets (Figure 11). 3.
Declaration of Incorporation Model No. 07389 Serial No. Product Description Invoice Description General Description Directive 315000001 and Up Cab Kit, Workman MD/MDX/MDX-D Utility Vehicle ELECTRIC CARGO BED LIFT KIT (2014+) Utility Vehicle 2006/42/EC, 2000/14/EC Relevant technical documentation has been compiled as required per Part B of Annex VII of 2006/42/EC.
The Toro Warranty Two-Year or 1,500 Hours Limited Warranty Parts Conditions and Products Covered The Toro Company warrants your Toro Commercial product (“Product”) to be free from defects in materials or workmanship for 2 years or 1,500 operational hours*, whichever occurs first. This warranty is applicable to all products with the exception of Aerators (refer to separate warranty statements for these products).