Form No. 3392-897 Rev A Electric Bed Lift Kit 2014 and After Workman® MDE Utility Vehicle Model No. 07396—Serial No. 315000001 and Up Installation Instructions Safety WARNING CALIFORNIA Proposition 65 Warning This product contains a chemical or chemicals known to the State of California to cause cancer, birth defects, or reproductive harm. Safety and Instructional Decals Safety decals and instructions are easily visible to the operator and are located near any area of potential danger.
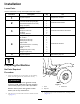
Installation Loose Parts Use the chart below to verify that all parts have been shipped. Procedure 1 2 3 4 5 Description Use Qty.
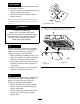
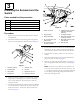
WARNING A raised box could fall and injure persons that are working beneath it. • Always use the prop rod to hold the box up before working under the box. • Remove any load material from the box before raising it. 4. Remove a short battery cable linking any 2 batteries in the battery bank to remove power from the system (Figure 2). Figure 2 1. Short battery cable WARNING 5. Remove the 4 flange nuts securing the latch-rod brackets to the underside of the box (Figure 3).
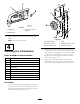
2 Installing the Bed Brackets Parts needed for this procedure: 1 Outer bed bracket (short flanges) 1 Inner bed bracket (long flanges) 1 Hex-head bolt (5/16 x 5-1/2 inch) 1 Flange nut (5/16) Figure 5 1. Outer bed bracket (short flanges) Procedure 3. Inner bed bracket (long flanges) 2. Bolts (5/16 x 3/4 inch) Perform the bed bracket installation on the bottom side of the bed. 3.
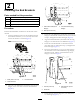
3 1 Installing the Solenoid and the Switch 2 3 10 4 Parts needed for this procedure: 5 9 1 Switch 1 Solenoid 2 Bolt (#10 x 3/4 inch) 2 Nut (#10) 1 Accessory harness 8 6 7 G025062 Figure 8 Procedure 1. Switch connector 6. Capped 48-volt connector extension (accessory harness) 2. Plug (in dash) 7. Accessory harness 1. Remove the hood to access the main harness and the solenoid plate. 3. Dash (underside) 8. Box lift kit connector, from accessory harness 2.
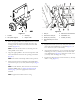
Figure 9 1. Plugged hole 3. Cut the new hole (if required). 2. Bed-lift switch 9. Plug the switch into the accessory connector in the dash. Figure 10 Note: Do not install the switch. 4 Parts needed for this procedure: Lift-cylinder support 1 Lift actuator 1 Clevis pin (3-1/2 inch) 1 Clevis pin (2-1/4 inch) 2 Hairpin cotter 1 Hex-head bolt (1/2 x 5-1/2 inch) 1 Locknut (1/2 inch) 2 U bolt 2 Carriage bolt (3/8 x 1 inch) 6 Flange nut (3/8 inch) 4. U-bolt 2. Right end of the axle 5.
1 2 3 2 G025060 7 g017661 6 5 4 Figure 12 Figure 11 1. Hair pin 5. Hole for the hex-head bolt 1. Actuator 3. Clevis pin 2. Hole for the clevis pin 6. Lift-actuator rod 2. Lift-cylinder support 4. Hairpin cotter 3. Clevis pin (3-1/2 inch) 7. Locknut (1/2 inch) 4. Hex-head bolt (1/2 x 5-1/2 inch) 4. Press the upper paddle of the bed-lift switch to extend the rod of the lift actuator rod until the hole in the rod aligns with the holes in the inner and outer bed brackets (Figure 12). 7.
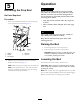
Operation 5 WARNING Removing the Prop Rod Driving the machine with the cargo box raised may cause the machine to tip or roll more easily. The box structure may become damaged if the box is raised for an extended period of time while operating the machine. No Parts Required Procedure • Only operate the machine when the cargo box is down. 1. Remove the hairpin and washer that secure the prop rod to the bottom of the bed (Figure 13). • After a load has been dumped, lower the cargo box.
Notes: 9
Declaration of Incorporation Model No. 07396 Serial No. Product Description Invoice Description General Description Directive 315000001 and Up Electric Bed Lift Kit, 2014 and After Workman MDE Utility Vehicle 48V ELECTRIC CARGO BED LIFT (2014+) Utility Vehicle 2006/42/EC, 2004/108/EC Relevant technical documentation has been compiled as required per Part B of Annex VII of 2006/42/EC.
International Distributor List Distributor: Country: Phone Number: Distributor: Phone Number: 57 1 236 4079 Colombia Japan 81 3 3252 2285 Czech Republic 420 255 704 220 420 255 704 Slovakia 220 Argentina 54 11 4 821 9999 Russia 7 495 411 61 20 Ecuador 593 4 239 6970 Finland 358 987 00733 Agrolanc Kft Balama Prima Engineering Equip. B-Ray Corporation Hungary Hong Kong Korea 36 27 539 640 852 2155 2163 82 32 551 2076 Maquiver S.A. Maruyama Mfg. Co. Inc. Mountfield a.s.
Toro General Commercial Product Warranty A Two-Year Limited Warranty Conditions and Products Covered The Toro Company and its affiliate, Toro Warranty Company, pursuant to an agreement between them, jointly warrant your Toro Commercial product (“Product”) to be free from defects in materials or workmanship for two years or 1500 operational hours*, whichever occurs first. This warranty is applicable to all products with the exception of Aerators (refer to separate warranty statements for these products).