Form No. 3424-841 Rev A Tooth Rake Sand Pro®/Infield Pro® 3040 and 5040 Traction Unit Model No. 08751—Serial No. 400000000 and Up Register at www.Toro.com.
g000502 Figure 2 Safety-alert symbol Introduction Read this information carefully to learn how to operate and maintain your product properly and to avoid injury and product damage. You are responsible for operating the product properly and safely. This manual uses 2 words to highlight information. Important calls attention to special mechanical information and Note emphasizes general information worthy of special attention. You may contact Toro directly at www.Toro.
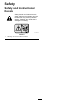
Safety Safety and Instructional Decals Safety decals and instructions are easily visible to the operator and are located near any area of potential danger. Replace any decal that is damaged or missing. decal106-5517 106-5517 1. Warning—do not touch the hot surface.
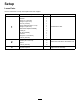
Setup Loose Parts Use the chart below to verify that all parts have been shipped. Procedure 1 2 3 Description Qty.
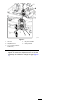
2. 1 Loosely mount the tongue tube to the rear hole in the hanger assembly with a flange-head bolt (3/8 x 1 inch) and a flange nut (3/8 inch).
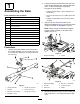
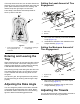
2 Mounting the Tooth Rake to the Traction Unit Parts needed for this procedure: 2 Bolt (3/8 x 2-1/2 inches) 4 Washer (3/8 x 7/8 inch) 2 Spacer 2 Locknut (3/8 inch) Procedure 1. 2. g220791 Figure 6 Remove any attachment from the rear of the machine. Lower the traction unit adapter and back the traction unit into position in front of the attachment adapter. Note: Make sure the locking lever is pivoted to the left (unlocked position) as viewed from the rear of the machine. 3. 1.
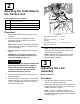
g220790 Figure 7 1. Jam nut 4. Lift-yoke shoulder 2. Adjustment nut 5. Heavy washer 3. 1.5 to 2 mm (0.060 to 0.080 inch) 3. If the gap is not correct, loosen the jam nut and tighten or loosen the adjustment nut on the link assembly as needed to change the gap (Figure 7).
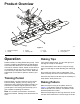
Product Overview g262222 Figure 8 1. Attachment adapter 3. Lift arm 5. Prong 7. Tooth rake hanger 2. Handle 4. Finishing rake 6. Trowel 8. Locking lever Operation Raking Tips Read this section on raking before raking a trap. There are many conditions that determine the adjustments to the tooth-rake attachment. The texture and depth of the sand, moisture content, weeds, and the amount of compaction all can vary from course to course, or even from trap to trap at the same course.
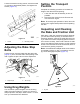
Setting the Least Amount of Tine Engagement of the trap almost to the end, turn to either direction as sharp as you can, and come right back next to the first pass. Spiral outward as shown in the drawing, and leave the trap at a right angle in a level area. Leave steep, short banks and small pockets for touch-up with a hand rake. g262217 Figure 10 1. Flat on top 3. Rake 2. Drawbar 1. Mount the hitch assembly so that the flat side is on top (Figure 10). 2.
Setting the Transport Position Loosen the trowel mounting screws, move the trowel up or down to the desired position, and tighten the screws (Figure 12). Complete the following procedure to increase the height of the rake when transporting: 1. Lower the rake and lift assembly as low as possible. 2. Disconnect the chains from the lift arms and reconnect them higher. Note: To ensure proper operation of rake, return the chains to the original slack position before operating the rake.
Maintenance Greasing the Attachment Adapter If the locking lever on the attachment adapter does not pivot freely and easily, apply a light coat of grease to the area shown in Figure 15.
Notes:
Notes:
Notes:
European Privacy Notice The Information Toro Collects Toro Warranty Company (Toro) respects your privacy. In order to process your warranty claim and contact you in the event of a product recall, we ask you to share certain personal information with us, either directly or through your local Toro company or dealer. The Toro warranty system is hosted on servers located within the United States where privacy law may not provide the same protection as applies in your country.
The Toro Warranty A Two-Year Limited Warranty Conditions and Products Covered The Toro Company and its affiliate, Toro Warranty Company, pursuant to an agreement between them, jointly warrant your Toro Commercial product (“Product”) to be free from defects in materials or workmanship for two years or 1500 operational hours*, whichever occurs first. This warranty is applicable to all products with the exception of Aerators (refer to separate warranty statements for these products).