Form No. 3370-336 Rev A Tooth Rake Sand Pro® 3040 and 5040 Traction Units Model No. 08751—Serial No. 310000851 and Up To register your product or download an Operator's Manual or Parts Catalog at no charge, go to www.Toro.com.
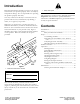
Introduction Figure 2 Read this information carefully to learn how to operate and maintain your product properly and to avoid injury and product damage. You are responsible for operating the product properly and safely. 1. Safety alert symbol This manual uses 2 other words to highlight information. Important calls attention to special mechanical information and Note emphasizes general information worthy of special attention. You may contact Toro directly at www.Toro.
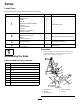
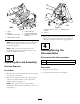
Safety Safety and Instructional Decals Safety decals and instructions are easily visible to the operator and are located near any area of potential danger. Replace any decal that is damaged or lost. 106-5517 1. Warning–Do Not touch the hot surface.
Setup Loose Parts Use the chart below to verify that all parts have been shipped. Procedure 1 2 3 4 Description Use Qty. Tooth rake assembly Shoulder bolt Washer Jam nut Attachment adapter assembly Cotter pin Lift arm assembly Pivot bar Bolt (3/8 x 1-1/4 inches) Locknut (3/8 inch) Bolt (3/8 x 2-1/2 inches) Washer (3/8 x 7/8 inch) Spacer Locknut (3/8 inch) 1 1 3 2 1 2 1 1 1 1 2 4 2 2 No parts required – Adjust the link assembly.
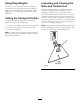
2. Align the lift arm with the bracket on the attachment adapter (Figure 4) and connect them using the pivot bar as illustrated in Figure 5. 2 Note: When moving the attachment adapter, use the handle provided on the back of the adapter (Figure 4). Mounting the Tooth Rake to the Traction Unit Parts needed for this procedure: 2 Bolt (3/8 x 2-1/2 inches) 4 Washer (3/8 x 7/8 inch) 2 Spacer 2 Locknut (3/8 inch) Procedure 1. Remove any attachment from the rear of the machine. 2.
Figure 7 1. 0.060 to 0.080 inch (.15 to .20 cm) 2. Jam nut Figure 6 1. Chain 2. Spacer 3. Bolt (3/8 x 2-1/2 inches) 5. Locknut (3/8 inch) 6. Traction unit rear frame 7. Long arm of the lift arm assembly 3. Adjustment nut 3. If the gap is not correct, loosen the jam nut and tighten or loosen the adjustment nut on the link assembly as needed to change the gap (Figure 7). 4.
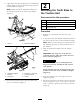
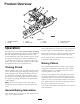
Product Overview Figure 8 1. Attachment adapter 2. Handle 5. Prong 6. Trowel 3. Lift arm 4. Finishing rake Operation 7. Tooth rake hanger 8. Locking lever If the sand feathers out to the turf, stay far enough away from the edge to avoid disturbing the underlying soil. We suggest that you read this entire section on raking before actually raking a trap. There are many conditions that will determine the adjustments necessary.
1 2 G003409 Figure 10 Figure 9 1. Enter a trap straight into the long dimension in a level area. 1. Rake pivot 2. Attachment adapter brackets 2. Exit a trap at a right angle in a level area. 3. More aggressive 4. Less aggressive Entering and Leaving the Trap Adjusting the Trowels When entering the trap, do not lower the rake until the rake is actually over the sand. This will avoid cutting the turf or dragging grass clippings or other debris into the trap.
Using Drag Weights Inspecting and Cleaning the Rake and Traction Unit In damp or coarse sand, or if there is considerable vegetation or deep foot prints in the traps, optional weights may be bolted to the finishing rakes. Order weight part no. 18-7570 from your Authorized Toro Distributor. When the raking operation is completed, clean the machine thoroughly. Since this machine is used primarily in sand, and sand is extremely abrasive, the sand should be flushed off after each use.
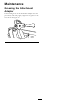
Maintenance Greasing the Attachment Adapter If the locking lever on the attachment adapter does not pivot freely and easily, apply a light coat of grease to the area shown in Figure 13.
Notes: 11
The Toro Total Coverage Guarantee A Limited Warranty Conditions and Products Covered The Toro® Company and its affiliate, Toro Warranty Company, pursuant to an agreement between them, jointly warrant your Toro Commercial product (“Product”) to be free from defects in materials or workmanship for two years or 1500 operational hours*, whichever occurs first. This warranty is applicable to all products with the exception of Aerators (refer to separate warranty statements for these products).