Form No. 3354-259 Rev A Spring Rake For Sand Pro®/Ineld Pro® 3040 and 5040 Traction Units Model No. 08752—Serial No. 260000001 and Up G003427 Register your product at www.Toro.
mechanical information and Note emphasizes general information worthy of special attention. Introduction Contents Read this information carefully to learn how to operate and maintain your product properly and to avoid injury and product damage. You are responsible for operating the product properly and safely. Introduction ......................................................... 2 Safety .................................................................. 3 Safety and Instructional Decals ...............
Safety Safety and Instructional Decals Safety decals and instructions are easily visible to the operator and are located near any area of potential danger. Replace any decal that is damaged or lost. 106-5517 With the Lift Arm Assembly Only 1. Warning—do not touch the hot surface.
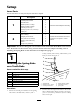
Setup Loose Parts Use the chart below to verify that all parts have been shipped. Step 1 2 Use Qty. Description 1 1 1 3 1 1 1 1 1 1 1 2 4 2 2 Spring rake assembly Curved pivot bracket Shoulder bolt Washer (0.531 x 1.063) Washer (0.469 x 0.922) Locknut (7/16 inch) Clevis pin (1/2 x 4-1/2 inches) Cotter pin Operator’s Manual Parts Catalog Straight pivot bracket Bolt (3/8 x 2-1/2 inches) Washer (3/8 x 7/8 inch) Spacer Flange nut (3/8 inch) Install the lift arm adapter assembly.
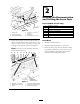
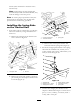
Step 2 3 4 2 Reading the Documentation and Storing the Loose Parts 5 6 Parts needed for this step: 1 1 1 1 2 4 2 2 G003429 Figure 4 1. Spring rake 4. 2. Tooth rake bracket 3. Curved pivot bracket 5. 6. Clevis pin (1/2 x 4-1/2 inches) Cotter pin Washer (0.531 x 1.063) Procedure 3. Secure the top link of each transport chain to the back of the lift arm with a bolt (3/8 x 2-1/2 inch), 2 washers (3/8 x 7/8 inch), a spacer, and a flange nut (3/8 inch) as shown in Figure 5. 1.
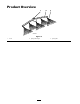
Product Overview 1 2 3 G003453 Figure 6 1. Pivot 2. Spring rake hanger 6 3.
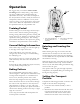
Operation 1 2 We suggest that you read this entire section on raking before actually raking a trap. There are many conditions that will determine the adjustments necessary. The texture and depth of the sand, moisture content, weeds, the amount of compaction; all these conditions can vary from course to course, or even from trap to trap on the same course. Make the adjustments on the rake for optimum results in your particular area.
6 links (when mounted on the back of the traction unit). Note: Transporting the rake with chains shortened beyond the recommended link, may result in damage to the rake pivots. Note: To ensure proper operation of rake, the chains must be returned to the original slack position before commencing operation. Installing the Spring Rake on the Traction Unit 2 1. If the spring rake is connected to a tooth rake, remove it as follows, saving all hardware for future use: 1 3 G003432 Figure 9 A.
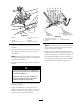
1 1 2 3 4 2 5 2 3 4 5 6 3 G003434 G003431 Figure 11 1. Adapter 4. 2. Handle 3. Washer (0.531 x 1.063) 5. 6. Figure 12 Clevis pin (1/2 x 4-1/2 inches) Cotter pin Straight pivot bracket 1. 2. 3. Bolt (3/8 x 2-1/2 inches) Washer (3/8 x 7/8 inch) Spacer 4. 5. Chain Locknut (3/8 inch) Note: For proper operation of the rake, the chains must be slack when the rake is in the lowered (operating) position. 4. Remove any attachment from the rear of the machine. 5.
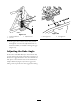
2 3 1 G003412 Figure 14 Figure 13 1. 0.060 to 0.080 inch 2. Jam nut 3. 1. More aggressive Adjustment nut 10. If the gap is not correct, loosen the jam nut and tighten or loosen the adjustment nut on the link assembly as needed to change the gap (Figure 13). Adjusting the Rake Angle If the rake is installed directly to the traction unit, you can change the angle of the rake to increase or decrease its aggressiveness in the sand.
Maintenance Inspecting and Cleaning the Rake and Traction Unit When the raking operation is completed, clean the machine thoroughly. Since this machine is used primarily in sand, and sand is extremely abrasive, the sand should be flushed off after each use. If the machine is cleaned frequently, (before the sand has a chance to cake), it can be cleaned with a stream of water from a hose with the nozzle removed.