Form No. 3354-277 Rev C Debris Blower For Sand Pro® 3040 & 5040 Model No. 08759—Serial No. 260000001 and Up Register your product at www.Toro.
This manual uses 2 other words to highlight information. Important calls attention to special mechanical information and Note emphasizes general information worthy of special attention. Introduction Read this information carefully to learn how to operate and maintain your product properly and to avoid injury and product damage. You are responsible for operating the product properly and safely. Contents Introduction ......................................................... 2 Safety ........................
Safety • Read and understand the contents of this Operator’s Manual before operating the machine. Become familiar with all of the controls and know how to stop quickly. A free replacement manual is available by sending the complete Model and Serial Number to The Toro® Company, 8111 Lyndale Avenue South, Bloomington, Minnesota 55420-1196. • Never allow children to operate the machine. Do not allow adults to operate machine without proper instruction.
• Perform only those maintenance instructions described in this manual. If major repairs are ever needed or assistance is desired, contact an Authorized Toro Distributor. replacement parts and accessories could void the warranty. Sound Pressure • To reduce a potential fire hazard, keep the engine free of excessive grease, grass, leaves, and accumulations of dirt. Never wash a warm engine or any electrical parts with water.
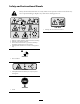
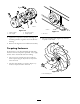
Safety and Instructional Decals Safety decals and instructions are easily visible to the operator and are located near any area of potential danger. Replace any decal that is damaged or lost. 106-5517 1. 98-3110 1. Warning—read the Operator’s Manual and receive training. 2. Warning—wear hearing protection. 3. Thrown object hazard—wear eye protection and keep bystanders a safe distance from the machine. 4. Cutting hazard of hand or foot—wait for moving parts to stop. 98-3111 1.
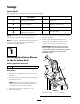
Setup Loose Parts Use the chart below to verify that all parts have been shipped. Step 1 2 3 4 Use Qty. Description Debris blower assembly 1 Mount the debris blower to the traction unit No parts required – Adjust the link assembly No parts required – Grease the blower Parts catalog Installation instructions 1 1 Finish the setup. Note: Determine the left and right sides of the machine from the normal operating position. 4. Pivot the locking lever to the right to lock the adapters together.
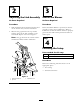
Step Step 2 3 Adjusting the Link Assembly Grease the Blower No Parts Required No Parts Required Procedure Procedure 1. With the debris blower mounted and secured on the traction unit, raise the attachment. Before the Debris Blower is operated, it must be greased to assure proper lubrication. Refer to Lubrication section of manual. Failure to properly grease the unit will result in premature failure of critical parts. 2.
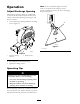
Operation Note: If the attachment adapter becomes stuck to the traction unit adapter, insert a prybar/screwdriver into the pry slot to disengage the parts (Figure 6). Adjust Discharge Opening The discharge opening (Figure 5) is adjustable to increase or decrease air output velocity and volume. Decreasing discharge opening size will increase velocity. 1. Loosen discharge opening deflector mounting screws (Figure 5). 1 G003783 Figure 6 1 2 1. Pry slot G003812 Figure 5 1. Discharge opening deector 2.
Maintenance Lubrication The debris blower has (2) fan shaft bearings that must be lubricated regularly. The bearings are located on each side of the blower housing. If the machine is operated under normal conditions, lubricate bearings with No. 2 general purpose lithium base grease after every 8 hours of operation or daily, whichever comes first. Lubricate fittings immediately after every washing, regardless of the interval listed.
3 2 4 1 G003815 1. Motor coupler 2. Fan coupler 3. 4. 1 G003816 Figure 10 Figure 11 Set screw (2 each) Coupler spider 1. Set screw 3. Tighten the capscrews and nuts securing the mounting brackets together and to the blower housing. • The fan mounting nut (Figure 12) must be torqued to 500 ft–lb. 4. Remove the alignment tool and finish assembly. Torquing Fasteners If the blower is ever disassembled, the following fasteners must be torqued as specified.
The Toro General Commercial Products Warranty A Two-Year Limited Warranty Conditions and Products Covered The Toro® Company and its afliate, Toro Warranty Company, pursuant to an agreement between them, jointly warrant your Toro Commercial Product (“Product") to be free from defects in materials or workmanship for two years or 1500 operational hours*, whichever occurs rst.