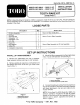
MODEL NO. 08812 — 20001 & UP MODEL NO. 08814 ~ 20001 & UP Form No. 3314-668 Rev. A INSTALLATION INSTRUCTIONS TOOTH RAKE KIT (SAND PRO®) NOTE: A Rake Mounting Kit, Model No. 08814 is required to install this kit to your Sand Pro. The kit must be purchased separately from an Authorized Toto Distributor. The installation instructions for the Rake Mounting Kit are LOOSE PARTS included in this sheet.
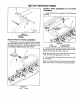
SET UP INSTRUCTIONS Figure 3 1. Lift Arm Assembly 2. Spacer 3. Caps crow MOUNT PIVOT TO RAKE ASSEMBLY 1. Slide lift pivot onto rake assembly plate, aligning mounting holes as shown in figure 4. Secure pivot to plate with a shoulder bolt, (2) flat washers and a lock nut. Position a washer on each side of pivot. Figure 4 1. Pivot 2. Plate MOUNT RAKE ASSEMBLY TO LIFT ARM ASSEMBLY 1. Back the Sand Pro into position in front of the rake assembly. 1. Pivot 2. Lift Brackets 2.
OPERATING INSTRUCTIONS We suggest that you read this entire section on RAKING before actually raking a trap. There are many conditions that will determine the adjustments necessary. The texture and depth of the sand, moisture content, weeds, the amount of compaction; all these conditions can vary from course to course, or even from trap to trap on the same courses. Make the adjustments on the rake for optimum results In your particular area.
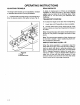
OPERATING INSTRUCTIONS ADJUSTING TROWELS The length of the trowels can be adjusted to increase or decrease the amount of prong penetration. 1. Loosen trowel mounting screws, move trowel up or down to desired position and tighten screws (Fig. 8} Figure 8 1. Trowel 2. Mounting Craws 43495 DRAG WEIGHTS In damp or coarse sand, or if there is considerable vegetation or deep foot prints in the traps, optional weights may be boated to the finishing rakes. Order weight part no.