
Operator's Manual
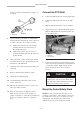
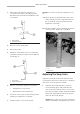
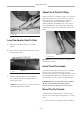
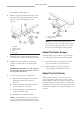
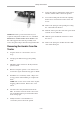
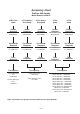
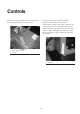
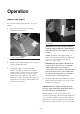
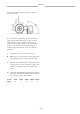
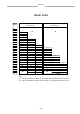

Figure 10
1. Sway link
Level the Aerator Side-To-Side
1. Park the tractor and aerator on a level, firm
surface.
2. Place a level on top of the aerator hood to check
for level side-to-side.
Figure 11
1. Level
3. Turn the adjustable link body (if provided) to
raise or lower the link arm until the aerator is
leveled side-to-side.
NOTE: Refer to the tractor operator’s manual for
additional adjustment procedures.
Adjust the 3-Point Lift Stop
Adjust and set the 3-point lift stop (Fig. 12) to provide
approximately 10cm (4”) ground clearance, when in
the raised position, to minimize PTO angle when
raising the aerator. For transporting or trailer
loading/unloading, the full lift range can be used as
long as the PTO tubes do not slide apart. Operating
the PTO in the fully raised position may damage the
PTO.
Figure 12
1. 3-point lift stop
NOTE: Refer to the tractor operator’s manual for
adjustment procedures.
Install Tines/Tine Heads
A wide selection of tines and tine heads are available
for the aerator. Choose the tine type, size and
spacings required for the job. Install the tine head and
tines per Installation Instructions supplied with each
tine kit. Refer to accessory chart for required tines.
IMPORTANT: Never operate the aerator without
the tine heads installed. The arms will move
excessively and may damage the aerator frame.
Mount The Turf Guards
A wide selection of turf guards are available for the
aerator. Choose the required turf guards per accessory
chart.
1. Loosen the nuts securing the turf guard clamps to
Set-Up Instructions
– 13 –
1
1
1