
Operator's Manual

– 18 –
Adjust Tine Depth
To adjust the working depth of the tine, proceed as
follows:
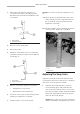
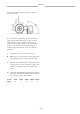
1. Remove the lynch pin from each depth
adjustment handle (Fig. 18).
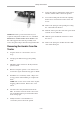
Figure 18
1. Depth adjustment handle
2. Turn the depth adjuster handles to raise (deeper)
or lower (shallow) the roller.
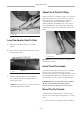
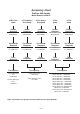
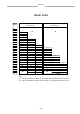
3. Depth guides (Fig. 19) are provided with
numbers 1 through 27. Depth varies with the
mounted angle of aerator, tine type and amount
of tine wear. Refer to the Depth Chart. Tine
depth between two numbers is approximately
0.20 inches (5 mm). The higher the number, the
deeper the tine penetration. Always adjust each
side to the same number.
Figure 19
1. Depth guide
IMPORTANT: If a large change in height is
required, adjust each leg by a small amount to
ensure the roller legs are adjusted as evenly as
possible.
NOTE: Remember: when depth changes are
made, you will need to adjust the top link length
to give the correct machine angle. Refer to
Connect the Upper Link.
IMPORTANT: Tine depth is affected by the
mounted angle of the aerator, as well as the
depth setting. If the aerator is angled
rearward, the tine heads may contact the turf
guards and damage may occur Depths 26 &
27 cannot be used when the aerator is in the
vertical position. See the Depth Chart.
4. Install the depth adjustment handles’ lynch pins
before running the machine, even if you are just
testing for correct depth.
IMPORTANT: Tine depth is determined by the
tine type, depth adjustment and mounted angle of
the aerator. Refer to the Depth Chart.
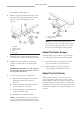
Maximum depth is achieved when the aerator is
mounted vertically (Fig. 20) and the depth adjustment
set at 25. In this condition, do not operate at greater
depth settings, as there is minimal clearance between
the tine head and the turf guards. Never operate with
Operation
1