
Operator's Manual


1. Check tension by depressing the belt upward at
the lower midspan of the pulleys with 14 Kg of
force. The belt should deflect 3–5 mm. If the
deflection is incorrect, go to the next step. If it is
correct, continue operation.
2. To adjust belt tension:
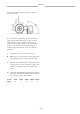
A. While holding the bolt (Fig. 31), loosen the
nut securing the idler pulley (Fig. 32)
Figure 31
1. Idler pulley bolt
2. Tine arm bolt (R.H and L.H. threads)
B. Insert a pry bar into the frame slot (Fig. 32)
and pry the idler toward the belt.
C. Tighten the nut while maintaining pressure
on the pry bar.
Figure 32
1. Idler pulley
2. Idler pulley nut
3. Frame slot
D. Rotate the crankshaft pulley two full turns to
seat the belt in the pulley grooves.
E. Check belt tension.
Replacing Belts
1. Loosen the idler pulley nut to release tension on
the belt (Fig. 32).
2. remove the idler pulley nut and remove the
pulley.
3. Loosen the tine arm bolts (right-hand and left-
hand threads).
4. Remove the fasteners securing the bottom of the
tine arm or rotalink arm to the bottom links (Fig.
33). Align the tine arm with the slot in the frame
and slide off the crank pin.
Figure 33
1. Tine arm
2. Bottom link
3. Rotalink arm
4. Lower link bearings
5. To ensure components are re-installed correctly,
mark the location of the end cover on the aerator
frame (Fig. 34).
6. Remove the eight cap screws and flat washers
securing the end over and bearing housing to the
end of the aerator frame.
Maintenance
– 26 –
1
3
4
2
2
1
2
3
1