
Operator's Manual
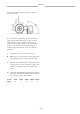


Figure 34
1. End cover
7. Loosen the bearing’s set screws (Fig. 35)
Figure 35
1. Bearing
8. Remove the end cover and bearing.
Note: Remove only the end cover necessary to
access belts being removed, i.e.,
Left cover—Left belts
Right cover—Right belts
9. Slide the belts off the pulleys.
10. Remove the belts from the aerator by routing
them over the drive shaft, through holes in frame
center plates, over bearings and out the hole in
the end of the frame.
IMPORTANT: When changing belts, always
change both belts on the pulley.
11. Route the new belts over the drive shaft and onto
the pulleys.
12. Reinstall the end cover onto the drive shaft. At
the location marked on the frame, secure the end
cover to the aerator frame with the cap screws
and flat washers removed earlier.
13. Reinstall the top of the tine arm to pulley with a
screw, lock washer and flat washer (right-hand
and left-hand threads).
14. Reinstall the bottom of the tine arm to the bottom
links or rotalink arm with the removed fasteners.
15. Adjust belt tension. Refer to Adjusting Belt
Tension.
Note: The heavy-duty sealed bearings used in
the lower links of the ProCore 660 and 880
aerators may also be used as replacement
bearings in the lower links for the ProCore 440
(Fig. 33). When the wider heavy-duty bearings
are used, eliminate the flat washer/spacers
normally used with narrower bearings.
Storage
At the end of an aerating season or when the aerator
will not be used for a long period, it is good practice
to do the following preventative maintenance.
1. Clean off any dirt or grease that may have
accumulated on the aerator or any of the moving
parts.
2. Remove the tines and clean out the hollow tines.
Coat tines with oil to prevent rusting during
storage.
3. Open the hood and clean out the inside of the
machine.
4. Lubricate all grease fittings.
5. Store the machine with the roller and castor
wheel standing on a hard, dry surface or board
and block the roller.
6. Remove the PTO drive shaft and store it under
the hood
7. Paint the roller and touch up any other scratches
on the paint work.
Maintenance
– 27 –
1
1