
Operator's Manual


11
SET-UP INSTRUCTIONS
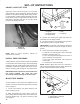
Figure 8
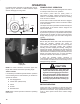
1. Castor wheel
2. Castor/ safety stand
1
2
5. Rear castor/safety stand has two positions:
Collapsed for aerator storage
Extended for aerator maintenance
6. Secure castor/safety stand in desired position with
pin. Tighten castor knob.
7. Slowly lower aerator to the ground.
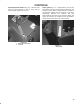
Figure 9
1. Pin
2. Castor knob
1
2
ADJUSTING SWAY LINKS
Adjust sway links on lower draft arms of 3-point hitch
to minimize side-to-side sway to a maximum of 1
inch (25 mm) on each side.
1. Adjust the lower links inboard until they contact the
aerator mounting plates. This will reduce the stress on
the pins. If the tractor has sway chains instead of sway
links, it is recommended that washers be installed
between the lower link arm and lynch pin to reduce the
over hung load on the lift pins.
NOTE: Refer to tractor operator's manual for additional
installation and adjustment procedures.
Figure 10
1. Sway link
1
LEVEL AERATOR SIDE-TO-SIDE
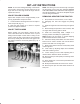
1. Park tractor and aerator on a level, firm surface.
2. Place level on top of aerator hood to check for level
side-to-side.
Figure 11
1. Level
1
3. Turn the adjustable link body (if provided) to raise
or lower the link arm until the aerator is leveled
side-to-side.
NOTE: Refer to tractor operator's manual for additional
adjustment procedures.