
Operator's Manual


13
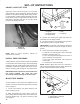
SET-UP INSTRUCTIONS
NOTE: To aid in the loading/unloading of the aerator
from a trailer, remove nuts securing each end of turf
finger tool bar to roller legs. Pivot turf finger tool bar
upward and secure.
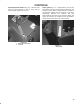
ADJUST ROLLER SCRAPER
Adjust roller scraper so there is approximately a 1/8"
(3mm) gap between scraper and roller.
1. Loosen fasteners securing each end of scraper to
roller scraper tab (Fig. 14).
2. Slide the roller scraper up or down to required
position and tighten fasteners.
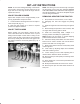
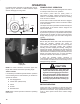
ADJUST TURF GUARDS
Before starting your new aerator, remove the rear
castor stand and lower the machine on the 3-point
linkage until the depth control roller is resting on the
ground. From the rear of the machine, check that the
tines line up exactly with the center of the gaps in the
turf guards. Install the correct turf guards (Fig. 15), if
necessary.
Figure 15
NOTE: Turf with a good root structure may not require
the turf guards. If this is the case. DO NOT REMOVE
THE TURF GUARD TOOL BAR as this adds support to
the roller leg assembly. Just remove the plastic fingers
from the turf guard bracket.
REMOVING AERATOR FROM TRACTOR
1. Stop vehicle on a level surface, not on a slope.
2. Disengage the PTO and engage the parking
brake.
3. STOP the engine and remove the key from ignition
switch.
4. Before leaving the operator's seat on tractor, wait
for engine and all moving parts to STOP.
5. Install rear castor/safety stand, collapse it to
storage position and install pin. Tighten knob.
NOTE: Aerator can be stored on original shipping
pallet if desired. Remove castor wheel.
6. Disconnect safety shield chains from PTO tractor.
Secure end of chain to aerator side of PTO shaft to
prevent PTO shaft from coming apart.
7. Slowly lower aerator until rear castor/safety stand
contacts ground.
8. Lower roller, by adjusting depth control handles,
until roller contacts ground.
9. Loosen locking nut and rotate adjusting link to
release tension between aerator and tractor.
10. Remove lynch pin and top link pin securing center
link to bracket.
11. Push release pin to disconnect powershaft from
tractor PTO shaft.
12. Slide powershaft back and remove from tractor.
13. Remove lynch pins and slide lower link arms off
hitch pins.