
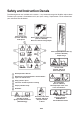
Operator's Manual


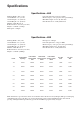


Tractor Requirements
• 18 KW—660
• 24 KW—880
•Correct tire pressure
•Category one 3-point hitch, rated to lift at
least a 1400 lb. (637 Kg) implement—660
Category one 3-point hitch, rated to lift at
least a 1700 lb. (771 Kg) implement—880
• 540 rpm tractor PTO
• Adequate front end weight (ballast)
Ballast Requirements
Refer to the tractor operator’s manual for ballast
requirements.
Connect Lower Link Arms
1. The aerator must be positioned on a flat, level
surface for installation.
2. Back the tractor squarely up to the aerator until
the lower link arms are aligned with the hitch
pins.
3. Make sure the PTO is disengaged.
4. Engage the parking brake, STOP the engine and
remove the key from the ignition. Wait for the
engine and all moving parts to STOP before
leaving the operator’s seat on the tractor.
5. Insert the right and left lower link arms onto the
hitch pins (Fig. 1).
Figure 1
1. Lower link
2. Lynch pin
6. Secure the lower link arms to the hitch pins with
lynch pins (Fig. 1)
Connect the Upper Link
NOTE: The front of the aerator MUST be vertical or
angle forward slightly while operating for best
aeration hole quality (Fig. 2). This angle will change
when depth adjustments are made. Adjust the upper
link to control this angle. Refer to Operation, p 19,
for additional information.
Figure 2
1. 0–8° Operating range
1. Connect the upper link (Fig. 3) to the bracket and
secure with a link pin and lynch pin.
1
2
9
Set-Up Instructions
To help prevent bodily injury and provide added
stability, make sure the front of the tractor is
equipped with proper ballast. Refer to the tractor
operator’s manual for ballast requirements.
CAUTION