
Installation Instructions
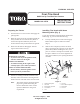

Installation Instructions
2
3. Mount the tine heads to the tine arms with (2)
M16 x 45 mm capscrews, flat washers, and lock
nuts (Fig. 1). Torque to 155–180 ft-lbs
(205–245 Nm).
Note: If mounting the tine head to MultiCore
Model No. 09697, 09698, or 09699,
you will need parts listed in the table
below which are not included in this
kit. Press the spacers into the tine head
mounting holes (Fig. 1) and use the
fasteners stated in the table to mount
the tine heads to the tine arms. Torque
to 60–70 ft-lbs (85–95 Nm).
Part Number
Quantity Description
100–7604 2 Spacer
33116–045 2 Capscrew
33096–00 2 Washer
33026–00 2 Lock nut
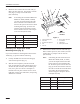
Installing Tine Heads with 12mm
Mounting Holes (Fig. 2)
If your tine heads have mounting holes that measure
12mm (Fig. 2), proceed with the following:
1. Loosely assemble the four-tine head using (6)
socket head capscrews (Fig. 2).
2. Slide the tines completely into the tine head
(Fig. 2) and torque the socket head capscrews to
35–40 ft-lbs (50–55 Nm). When installing the
tines, use a piece of wood or a metal plate to
hold the tines into place until the screws can be
tightened. If using open–sided tines, the opening
should face rearward.
2
4
3
6
5
Rear of
machine
7
8
1
9
Figure 2
1. 12mm mounting hole
2. Tine head
3. Socket head capscrew
4. Tine
5. Tine arm
6. M12 x 35mm capscrew
7. Lock washer
8. Flat washer
9. Press spacers here
3. Mount the tine heads to the tine arms with (2)
M12 x 35mm capscrews, lock washers, and flat
washers (Fig. 2). Torque to 60 to 70 ft-lbs
(85–95 Nm).
Note: If mounting the tine head to ProCore
Model No. 09700, 09701, or 09702,
you will need parts listed in the table
below which are not included in this
kit. Press the spacers into the tine arm
(Fig. 2) and use the fasteners stated in
the table to mount the tine heads to the
tine arms in the opposite direction
shown in Figure 2. Torque to 60–70
ft-lbs (85–95 Nm).
Part Number
Quantity Description
100–7604 2 Spacer
33116–045 2 Capscrew
33096–00 2 Washer
33026–00 2 Lock nut