
Installation Instructions


Installation Instructions
10
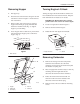
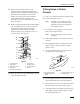
Installing
Hoses to Air Cleaner
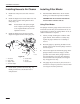
1. Install hose clamps on to the ends of the two
hoses.
2. Install the adapter hose and air intake hose onto
the air cleaner canister and tighten the hose
clamps (Fig. 16).
Note: Ensure that air inlet points straight
down. Adjust by loosening bracket
screw. Tighten bracket screw when
adjustment is done.
3. Install the adapter hose onto the air intake
adapter and tighten the hose clamp (Fig. 16).
5
2
1
2
3
2
4
7
6
Figure 16
1. Air
Cleaner
2.
Hose Clamp
3.
Adapter Hose
4.
Air Intake Adapter
5.
Console Hose
6.
Air Inlet
7.
Bracket Screw
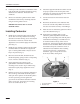
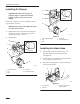
4. Install rubber grommet onto hose. (Fig. 13).
Install grommet into console after hose is
clamped down.
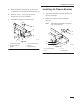
Installing
Filter Minder
1. Install the Filter Minder Kit to the air cleaner
housing. Use instructions provided in that kit.
IMPORTANT: Do not discard instructions.
Save for future reference and use.
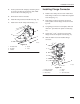
Using Filter Minder
The plunger inside the gauge canister will rise as the
air cleaner becomes dirty and restricted from use. As
it approaches or reaches the “Change Filter” level, air
cleaner maintenance is required.
1. Start by visually checking the condition of the
paper element. If the element is visually dirty,
replace the paper element. Do not attempt to
clean it.
2. Reset the gauge by depressing the button in the
bottom of the canister until the plunger returns to
the lowest point.
3. Test run the engine and recheck the gauge. If the
plunger remains in the lower ranges, normal
operation can resume. If the plunger returns to
the “Change Filter” level, the paper element is
restricted and must be replaced, even though it
may not appear to be dirty.
4. The gauge may be reset at any time, however it
will return to the prior position if corrective filter
servicing has not been performed.