
Installation Instructions


Installation Instructions
3
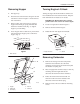
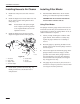
Removing
Hopper
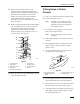
1. Tilt hopper up.
2. Disconnect the wire harnesses along the rear left
side frame as shown in figure 1. Ensure that it is
free of the frame.
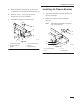
3. Remove safety clip from end of gas spring to
hopper. Disconnect gas spring from ball stud
attached to machine frame (Fig. 2). Support
hopper to prevent falling.
4. Lower hopper. Remove both clevis pins from the
rear frame that the hopper pivots on. Remove
hopper. (Fig. 2).
1
M-4582
Figure 1
1. Wire
Harness
1
2
5
3
M-4581
4
Figure
2
1. Hopper
2. Safety
Clip
3.
Gas Spring
4.
Hair Pin
5.
Clevis pin
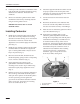
Turning
Engine Lift Hook
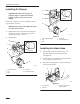
Turning the engine lift hook will allow clearance for
hose installed later in this instruction sheet. Keep the
hook and hardware for future use if needed.
IMPORTANT: Return lift hook to original
position before it is used for to remove engine.
1. Locate on engine the lift hook in figure 3.
2. Remove the lift hook from engine.
3. Rotate lift hook 180 degrees and reinstall.
1
2
M-4583
Figure 3
1. Engine
Lift Hook
2. Screws
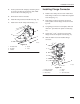
Removing
Carburetor
1. Remove all existing air cleaner components
attached to the carburetor. Save the three
mounting screws from the air cleaner base plate
and discard everything else.
2. Have an appropriate container ready to catch any
remaining fuel that might leak out and
disconnect the fuel line from the carburetor.
3. Follow the red lead from the fuel shut–off
solenoid on the front of the carburetor and
disconnect it from the harness plug.
4. Remove and save the two carburetor mounting
screws.