
Installation Instructions


Installation Instructions
4
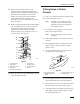
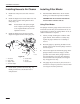
5. Lift and pivot the carburetor to unhook the choke
link, throttle link, and throttle dampening spring
attached to the carburetor. Discard the old
carburetor.
6. Remove the carburetor gasket from the intake
manifold and clean off any remaining material
using an aerosol gasket remover.
IMPORTANT: Do not nick or scratch
manifold surface.
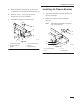
Installing
Carburetor
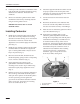
1. Install the two triangular plugs from the kit into
the air ducts on the top of the blower housing.
Start the two thread–forming screws from the kit
into the holes in the front of the air ducts.
Tighten the screws until the plugs are locked into
place (Fig. 5).
2. Install the new carburetor gasket onto the intake
manifold. Make sure all holes are aligned and
open. A dab of gasket adhesive may be used to
keep it in position (Fig. 5).
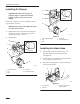
3. Reconnect the choke link, throttle link, and
throttle dampening spring into the corresponding
levers of the new carburetor (Fig. 5).
4. Set the carburetor into position on the
gasket/intake manifold and install the two
mounting screws saved in step 4 of Removing
Carburetor. Lightly finger tighten the screws
(Fig. 5).
5. Hold the governor lever toward the carburetor as
far as it will go. Check that the throttle plate is
wide open in this position. If the throttle plate is
not wide open, keep pressure against the
governor lever and shift the carburetor until the
plate is wide open. Torque the two mounting
screws to 9.9 NSm (88 in.–lb.).
6. Check the equipment throttle and choke controls
for proper operation. Be sure the plates in the
carburetor are opening and closing fully with the
movement of the control levers.
7. Connect the lead wire from the fuel shut–off
solenoid.
8. Reconnect the fuel line to the carburetor inlet
and secure with the clamp. Make sure the fuel
line does not interfere with any of the linkages.
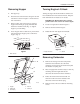
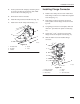
9. Place the new air cleaner base gasket from kit on
top of the carburetor (Fig. 5).
10. Position the new adapter plate over the
carburetor gasket and pull the breather tube
through the corresponding hole until the plate is
seated between the flanges. Assemble the new
air cleaner bracket to the top of the new air
cleaner base, inserting the breather tube through
the hole in side of bracket. Make sure the end of
the breather tube points toward the center of
carburetor throat. Install the three mounting
screws removed in step 1 of Removing
Carburetor, page 3. Torque the screws to
88 in. lb (9.9 N•m). See figure 4.
2
1
3
Figure 4
1. Air
Cleaner Bracket
2.
Breather T
ube
3.
Mounting Screw