
Installation Instructions


Installation Instructions
8
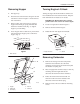
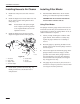
Installing
Air Cleaner
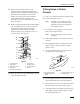
IMPORTANT:
Ther
e are two types of
bumpers. Figure 11 shows the extended
bumper. Figure 12 shows the recessed
bumper.
Refer to #1 in figures 11 and 12 to determine which
type of bumper you have.
IMPORTANT: Ensure you install bolts in the
correct holes in bracket.
1. Install bolts in the correct holes for which type
of bumper you have. Install bolts with heads
towards the top (Fig. 11 or 12).
2. Tighten bolts.
5
2
m-4576
1
3
4
TOP VIEW
1
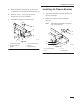
Figure 1
1
1. Extended
Bumper
2. Nut
3. Bolt
4.
Air Cleaner
5.
Rear Bracket Holes
TOP VIEW
5
2
m-4577
1
3
4
1
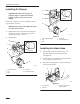
Figure
12
1. Non–Extended
Bumper
2. Nut
3. Bolt
4.
Air Cleaner
5.
Front Bracket Holes
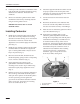
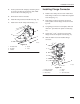
Installing
Air Intake Hose
1. Install rubber grommet onto hose. (Fig. 13).
Install grommet into console after hose is
clamped down.
2. Locate and insert air intake hose into the bottom
hole of plastic console. (Fig. 13).
3. Route hose through plastic console and into the
hole cut in top surface.
m–457
5
2
1
3
Figure 13
1. Air
Intake Hose
2. Grommet
3.
Hole cut into bottom of
plastic console