
Installation Instructions


1
W 2005 by The Toro Company
8111 Lyndale Avenue South
Bloomington, MN 55420-1196
Contact us at www.Toro.com
All Rights Reserved
Printed in the USA
Original Instructions (EN)
Light Kit
for Compact Utility Loaders
Part No. 100-8840 (4-Paw and TX Models)
Part No. 100-8940 (Chain Drive Models)
Form No. 3353-864 Rev A
Installation Instructions
Loose Parts
Description Qty. Use
Bracket
Curved (Belleville) washer
Self-tapping bolt
2
2
4
Installation of the mounting bracket
Light assembly, with switch
Light assembly, without switch
Flat washer
Rubber grommet
1
1
4
2
Installation of the lights
T-wire harness (kit 100–8940 only) 1
Upgrade the main wire harness on chain-drive
traction units
Lighting wire harness
Plastic tie
1
1
Wiring the lights
Preparing the Traction Unit
Note: If you are installing this kit on a chain-drive
traction unit, skip this section.
1. Start the engine and raise the loader arms.
2. Stop the engine and remove the key.
3. Install the cylinder locks.
4. Remove/open the front hood; refer to you traction unit
Operator’s Manual for more information.
Upgrading the Wiring of
Chain-Drive Traction Units
Note: If you are installing this kit on a 4-Paw or TX
traction unit, skip this section.
1. Pull the main wire harness plug off of the back of the
ignition switch.
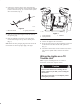
2. Connect the T-wire harness to the main wire harness
(Fig. 1).
3. Connect the T-wire harness to the back of the ignition
switch (Fig. 1).
m–4899
1
2
3
4
Figure 1
1. T-wire harness
2. Main wire harness
3. Ignition
4. Lighting wire harness
Drilling Installation Holes in
Chain-Drive Traction Units
Note: If you are installing this kit on a 4-Paw or TX
traction unit, skip this section.
Some of the older chain-drive traction units do not have
holes drilled for the lights. Drill these holes as follows.
1. On the both sides of the frame, mark hole locations
2-5/8 in. (6.6 cm.) behind and 2 in. (5 cm) above the
loader arm pivot centers (Fig. 2).