
Installation Instructions


3
m–4898
1
5
7
3
8
3
4
6
2
9
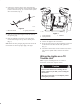
Figure 4
1. Light
2. Carriage bolt
3. Flat Washer
4. Bracket
5. Self-tapping bolt
6. Curved washer
7. Rubber grommet
8. Lockwasher
9. Nut
2. Remove and save the nut and lockwasher from the
carriage bolt on each light assembly.
3. Place a flat washer on the carriage bolt on each light
(Fig. 4).
4. Insert the rubber grommets into the outer holes in the
brackets (Fig. 4)
5. Insert the carriage bolts on each light through the
rubber grommets in the brackets (Fig. 4).
Note: Install the light with the switch on top of it on the
left side of the traction unit.
6. Secure each light with a flat washer and the
lockwasher and nut you removed in step 2 (Fig. 4).
Installing the Lights on a TX
Traction Unit
Note: If you are installing this kit on a 4-Paw or
chain-drive traction unit, skip this section.
1. Install the brackets using the 4 self-tapping bolts
(Fig. 5).
Note: You will not use the curved washers.
m–4898
1
5
7
3
3
4
6
2
8
Figure 5
1. Light
2. Carriage bolt
3. Flat Washer
4. Bracket
5. Self-tapping bolt
6. Rubber grommet
7. Lockwasher
8. Nut
2. Remove and save the nut and lockwasher from the
carriage bolt on each light assembly.
3. Place a flat washer on the carriage bolt on each light
(Fig. 5).
4. Insert the rubber grommets into the inner holes in the
brackets (Fig. 5)
5. Insert the carriage bolts on each light through the
rubber grommets in the brackets (Fig. 5).
Note: Install the light with the switch on top of it on the
left side of the traction unit.
6. Secure each light with a flat washer and the
lockwasher and nut you removed in step 2 (Fig. 5).
Wiring the Lights on a 4-Paw
or Chain-drive Traction Unit
Note: If you are installing this kit on a TX traction unit,
skip this section.
If the traction unit has been running, the hot
engine could burn you while you are routing the
wire harness.
Allow the traction unit to cool completely before
starting this procedure.
Caution